
Archive for February 2020
Upgrade the Angular .NET Core SPA Template to Angular 9
Angular 9 has just been released and includes a number of major improvements. Be sure to check the official announcement to learn more. If like me you build single page apps with ASP.NET Core and Angular you will be keen to upgrade. This post details the steps required to upgrade the .NET Core project template to Angular 9.
Prerequisites
Ensure that you meet the following prerequisites:
Creating a new project
Create a Angular .NET Core SPA project from the command-line by running:
dotnet new angular –output AngularSpa –auth Individual
The ASP.NET Core project provides an API back end and the Angular CLI project (contained within ClientApp) provides the front end / SPA.
The output argument specifies the output directory name, and, since no name argument is specified, it is also the name for the new project.
Authentication can be added using the optional auth argument. Specifying Individual creates the project using ASP.NET Core Identity for authenticating and storing users combined with IdentityServer for implementing OIDC.
Build the new solution using the following commands:
cd AngularSpa
dotnet build
The above command restores NuGet / npm dependencies (takes a few minutes) and then builds the entire project.
Next, create a new git repository and commit the initial version using the following commands:
git init
git add .
git commit -m “Initial version”
In the next section, you will upgrade the project to Angular 9.
Upgrade to Angular 9
The process is relatively straightforward, aside from a couple of issues we will cover later. First, switch to the Angular SPA directory (ClientApp):
cd ClientApp
Next, run ng update to update to the latest 8.x version and then commit those changes:
ng update @angular/core@8 @angular/cli@8
git commit -a -m “Update to latest version of Angular 8”
Next, run ng update again to upgrade to Angular 9 and then commit those changes:
ng update @angular/core@9 @angular/cli@9
git commit -a -m “Upgrade to Angular 9”
If everything was successful, you will see the following message:
Your project has been updated to Angular version 9!
For more info, please see: https://v9.angular.io/guide/updating-to-version-9
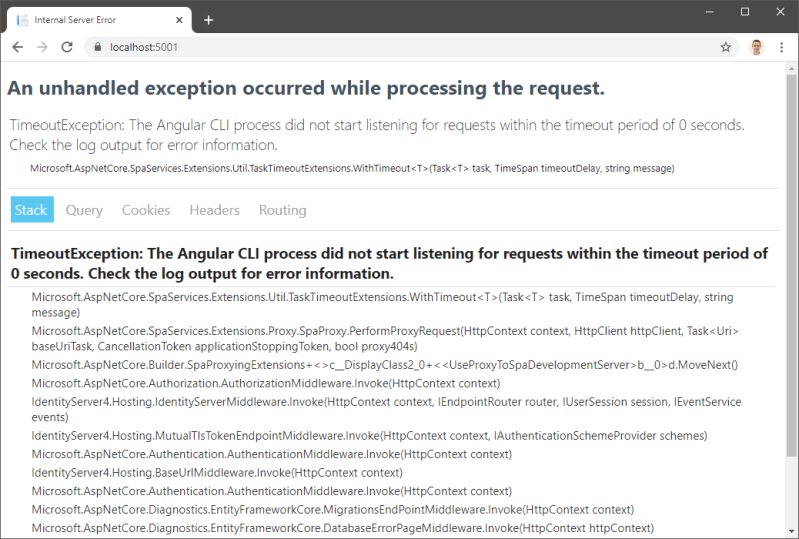
Don’t get too excited, we are not done yet. You will receive the following error if you attempt to build the Angular project:
Generating ES5 bundles for differential loading…
An unhandled exception occurred: C:CodeScratchAngularSpaClientAppvendor-es2015.js: ‘with’ in strict mode (136749:4)
136747 | Window_run: function _run(code, file) {
136748 | if (file) code += ‘n//@ sourceURL=’ + file;
> 136749 | with(this) eval(code);
| ^
136750 | },
136751 | EventHandlerBuilder_build: function build() {
136752 | try {
See “C:UsersjasonAppDataLocalTempng-MEnshjangular-errors.log” for further details.
You can learn more about this issue here. However to resolve this issue, simply remove the following line from ClientApp/src/main.ts:
export { renderModule, renderModuleFactory } from ‘@angular/platform-server’;
Finally, run ng build and, if successful, commit your changes:
ng build
git commit -a -m “Resolved issue with template”
No further steps required! In the next section, you will launch the project to verify the upgrade was successful.
Launching the project
Normally launching the project is as easy as executing dotnet run, however, if you do so now, you will see the following error:
You can learn more about this issue here. Fortunately, it is easy to resolve this issue. First, open ClientApp/package.json and locate this line:
“start”: “ng serve”,
Then change to include an echo command as follows:
“start”: “echo Starting… && ng serve”,
Easy. Be sure to commit these changes too:
git commit -a -m “Resolved issue #2 with template”
Now launch the project from the root directory using dotnet run. The project will build, start the front and back end, and then display the following message:
Now listening on: https://localhost:5001
Browse to https://localhost:5001 to see the home page of the new project:
That’s it! You are ready to get started developing with Angular 9 and ASP.NET Core 3.1. Thanks for reading, be sure to take a look at some of the other posts in this category. If you did run into any issues, view the sample code for this post. If you can’t figure it out from there, please post a comment below.
Getting started with Form Recognizer (preview)
When I first heard about Form Recognizer, I thought to myself, “Wow, there are so many forms in the real world that needs to be parsed and digitilized!”. Once v2 preview came out, I finally decided to build an app that will parse through all of our user feedback from the last AI Hack Day.
Form Recognizer is an Azure Cognitive Services that allow us to parse text on forms in a structured format. Now we can extract the location and size (bounding box) for where information was entered or written along with the OCR’d text values.
For feedback forms this means, I can get feedback from users by merely uploading their scanned forms to trained custom Form Recognizer.
Prerequisite
In this blog post will attempt to recognize user feedback using Form Recognizer and Form Recognizer to do custom form recognition rather than built-in one.
We’ll need:
Filled out forms
Azure Account
Docker (optional)
Azure Storage Explorer
UPDATE 05/05/2020: The setup process is now automated and you’ll now be able to train and use custom forms much faster than before. 😀
1. Filled out forms
You’ll need at least 6 filled out forms for this demo.As co-organizer of AI Hack Day, I’m using the SSW User Group Evaluation Survey which you can download, fill out, and scan if you don’t have your forms.
Microsoft also have their own data set, if you prefer prefilled: https://github.com/Azure-Samples/cognitive-services-REST-api-samples/blob/master/curl/form-recognizer/sample_data.zip
2. Create Resources
To get started, you can either go to Azure Portal and create a new resource for Form Recognizer or use PowerShell with Azure CLI to create that resource faster. The script will save you about 15 minutes of work and works with existing resources (you can re-run it)!
Find the script on Gist: https://gist.github.com/jernejk/fdb42e032a9568d42dc8c2f05bd1fc13
Run with PowerShell Core (replace the […]):
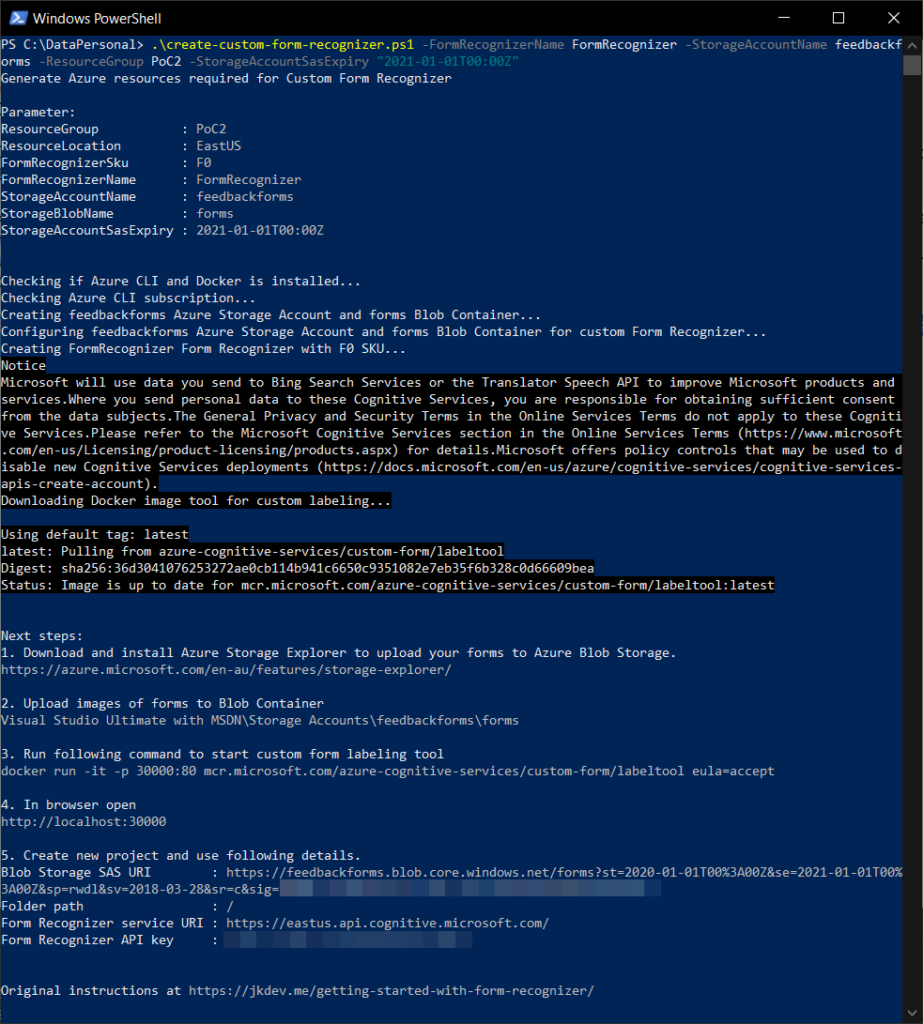
.create-custom-form-recognizer.ps1 `
-FormRecognizerName [FormsName] `
-StorageAccountName [BlobStorageAccountName] `
-ResourceGroup [ResourceGroupName] `
-StorageAccountSasExpiry “2021-01-01T00:00Z” `
-InstallationType Web
Figure: Example run for Docker configuration.
Run set-executionpolicy unrestricted in admin mode if you don’t have permission to run scripts.
The script will:
Create Azure Blob Storage (name needs to be lowercase)
Correctly configure Azure Blob Storage (CORS and SAS)
Create Form Recognizer
Give you instructions and information required for completing the setup
You can decide how to run the tool by changing -InstallationType argument:
Website hosted by Microsoft -InstallationType Web (default)
Docker Container -InstallationType Docker
Running React app locally from GitHub source -InstallationType Web
If you’re interested how to configure everything from scratch, you can visit Train a Form Recognizer model with labels using the sample labeling tool at Microsoft Docs.
3. Create a project
Whew, that’s a lot of prep work for one service, but now we can start!
Run Form Recognizer Tool via Docker:
docker run -it -p 30000:80 mcr.microsoft.com/azure-cognitive-services/custom-form/labeltool eula=accept
Once running, go to “https://localhost:30000” and let us create a new project.
Add name
“Add Connection”
Add a name for the connection
Copy “Blob Storage SAS URI”
Folder path is empty in this case
Copy “Form Recognizer service uri” and “Form Recognizer API key” from the script results
We finally have our project created!
4. Start labeling
You’ll notice that the project is empty and it doesn’t give you options to upload images. To get your forms in (images or PDF), you’ll have to upload them to the Blob Storage we created for this project. You can use Microsoft Azure Storage Explorer to upload your forms.
TIP: Don’t upload all of your images because you want to leave some of them for testing.
Once they are uploaded, refresh the page on the Form Recognizer Tool.
Wait for OCR to complete
Create tags in the right column you want to recognize (name, email, etc.)
Select the detected text (it will be light green)
Select the correct tag (e.g. “Position”)
The selected text will now have the same color as the tag
Do this for all of the text you want to be tagged on all of the forms.
NOTE: This tool supports only one form per image/PDF. Form with multiple pages will be treated as a single multipage form!
5. Training
Go to Train icon
Click “Train”
Done! 🎉
6. Testing
Go to 2 squares icon
Browse
Predict! 🎉
NOTE: If using are free tier, this may take a while because of the rate limit.
Personally, I’m using PowerAutomate to use Custom Form Recognizer because I can add Form Recognizer as a step in flow with no code. Instead of writting an app, I simply create a button trigger in flow and share that flow with other admins, which allows them to use it on their phone or desktop.
What’s next
The form recognizer works mostly well however, there are a few issues I need to address:
OCR isn’t always great especially if someone’s handwriting isn’t great
This version doesn’t recognize checkboxes (the feature is on their backlog)
When uploading a multipage PDF, it treats it as a single form on multiple pages. We need to split it up into multiple images/PDFs
At the moment I’m experimenting with recognizing checkboxes myself. However, I’m happy that we can quickly get images into structured data and do a bit of correction and add ratings rather than typing everything from scratch. I’m looking forward to the day when our feedback forms for hack days and user groups are automated and we can send feedback to guest speakers much quicker (and enjoying the weekend instead of entering data! 😁).
Introducing SSW People!
About a year ago, during SSW’s annual retreat in Brisbane, we started to imagine what the world would look like if the SSW Rules site was easier to use. Therefore, we had to find an alternative to SharePoint’s content management features.The first tech we evaluated was an Angular application. Even though we love building complicated applications on Angular, we discounted it as it didn’t suit simple content pages. Next we investigated static site generators and realized this was going to be much better.
Going JAMStack
There are a lot of static site generators such as Jekyll, NextJS, and Gatsby all with strengths and weaknesses. Collectively they are known as the JAMStack
The Jamstack is not about specific technologies. It’s a new way of building websites and apps that delivers better performance, higher security, lower cost of scaling, and a better developer experience.
Pre-rendered sites can be enhanced with JavaScript and the growing capabilities of browsers and services available via APIs.
https://jamstack.org
Dipping our toe in something smaller
We also quickly realized that the old SSW Employee pages (was https://sharepoint.ssw.com.au/AboutUs/Employees) were very similar to our SSW Rules pages, being:
Static content
Hosted on SharePoint
Publicly accessible
So we built the Employee Pages first – basically a prototype for Rules V2. By that time we were approaching NDC 2019 and got busy on various other projects, such as the SSW Rewards App… however on SSW bench time Matt W. and Jean T. were able to continue it and released it January 2020.
Of course, things got a bit more complicated than initially planned, and we had to deal with a few hiccups – such as changing our preferred JAMStack and migrating SharePoint history into GitHub history. Thank you also to Tiago, Harry, Sebastien, and David.
Figure: Index – Old site on SharePoint Figure: Profile – Old site on SharePoint
Announcing SSW People
I am happy to announce the release of our SSW Employee Pages V2, now re-branded as SSW People – https://www.ssw.com.au/people
Figure: The new Flow (without SharePoint) Figure: Index – New site powered by GitHub and JAMStack Figure: Profile – New site powered by GitHub and JAMStack
A month ago we released it internally
Everyone’s old profile (i.e. SharePoint) was locked and put in a read-only state. Then the data was migrated from SharePoint to GitHub… and soon there’ll be one less SharePoint server.
The changed workflow was well received.
Employees now have their instructions out in the open to edit their profile: https://github.com/SSWConsulting/People/blob/master/README.md
Every time they edit their GitHub profile page the site pages are re-generated.
Every time they edit their GitHub profile, they’re getting more dots on their GitHub stats page
Let’s look at Jean’s page as an example: https://www.ssw.com.au/people/Jean-Thirion – the “edit” link takes you to: https://github.com/SSWConsulting/People/blob/master/Jean-Thirion/Jean-Thirion.md
Then we got feedback on Microsoft Forms
TODO: [Include stats from the MS Form]
The Tech Stack
Frontend – JAMStack, Gatsby – https://rules.ssw.com.au/static-site-generator
Note: We evaluated a number of frameworks, including Jekyll (it was great, but too simple) and Next.js (we had reliability problems with page generation), and then settled on Gatsby (works natively with GitHub as a data source and you can query via GraphQL based on tags and branches).
Data format – Markdown – https://rules.ssw.com.au/using-markdown-to-store-your-content
Data – GitHub
Data – Dynamics 365 skills
Source Code – GitHub
Pipelines – Azure DevOps
The GitHub repo is available here for those who want to have a closer look: https://github.com/SSWConsulting/people.ssw.com.au
This is a Gatsby generated website, leveraging data from SSW Profiles (now on GitHub!) https://github.com/SSWConsulting/People and our CRM (thanks to William for the integration). Pages are automatically re-generated and published to our SSW website when a profile markdown page is updated.
Performance – SharePoint vs Static Pages
Moving to static pages generated with Gatsby provided a significant performance boost. Specifically from 68% to 100%
Figure: Before – Adam’s page performance – No throttling Figure: After – Adam’s page performance – No throttling Figure: Before – Index page performance Figure: After – Index page performance
Not only do the pages load heaps faster, they *feel* much more responsive.
Redirects
As we changed all profile URLs, we added 301 redirects from all the old pages to the new ones (see Do you use “301” code to redirect renamed or moved pages?). This ensures we don’t lose our Google juice and users wont see 404’s.
What we don’t have
Location – subdomains vs subdirectories
Which one do you like better? A subdomain (people.ssw.com.au) or a subdirectory (ssw.com.au/people)?We decided to use subdirectories because of the nice URL. I was worried about SEO impacts, but after a fair bit of research we discovered that from a purely SEO ranking perspective, the ‘sub folder versus sub domain’ debate is a bit of a myth – it doesn’t really matter. Google is smart enough to work it out. So it really comes down to personal preference.
Summary
As usual, I am very keen to get your feedback. Please have a look and click around. Send any changes to me, or even better be modern and use GitHub Issues (via the edit button in the top right-hand corner).
Now that SSW.People is live, we will likely attack the big monster that is SSW Rules V2. We may follow the exact same process that we used for SSW.People and hopefully it will go much quicker this time, thanks to the lessons learnt. New challenges ahead! Stay tuned
Clean Architecture with .NET Core: Getting Started
Over the past two years, I’ve travelled the world teaching programmers how to build enterprise applications using Clean Architecture with .NET Core. I started by providing a sample solution using the iconic Northwind Traders database. Recently, I’ve developed a new Clean Architecture Solution Template for .NET Core.
This post provides an overview of Clean Architecture and introduces the new Clean Architecture Solution Template, a .NET Core Project template for building applications based on Angular, ASP.NET Core 3.1, and Clean Architecture.
Let’s start with an overview of Clean Architecture.
Overview
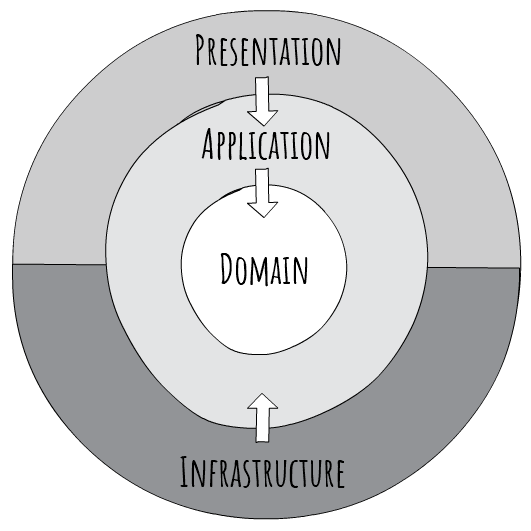
With Clean Architecture, the Domain and Application layers are at the centre of the design. This is known as the Core of the system.
The Domain layer contains enterprise logic and types and the Application layer contains business logic and types. The difference is that enterprise logic could be shared across many systems, whereas the business logic will typically only be used within this system.
Core should not be dependent on data access and other infrastructure concerns so those dependencies are inverted. This is achieved by adding interfaces or abstractions within Core that are implemented by layers outside of Core. For example, if you wanted to implement the Repository pattern you would do so by adding an interface within Core and adding the implementation within Infrastructure.
All dependencies flow inwards and Core has no dependency on any other layer. Infrastructure and Presentation depend on Core, but not on one another.
Figure: Clean Architecture Diagram
This results in architecture and design that is:
Independent of frameworks it does not require the existence of some tool or framework
Testable easy to test – Core has no dependencies on anything external, so writing automated tests is much easier
Independent of UI logic is kept out of the UI so it is easy to change to another technology – right now you might be using Angular, soon Vue, eventually Blazor!
Independent of the database data-access concerns are cleanly separated so moving from SQL Server to CosmosDB or otherwise is trivial
Independent of anything external in fact, Core is completely isolated from the outside world – the difference between a system that will last 3 years, and one that will last 20 years
In the above design, there are only three circles, you may need more. Think of this as a starting point. Just remember to keep all dependencies pointing inwards.
Let’s take a look at a simple approach to getting started with the new Clean Architecture Solution Template.
Solution template
This template provides an awesome approach to building solutions based on ASP.NET Core 3.1 and Angular 8 that follow the principles of Clean Architecture. If Angular is not your thing, worry not, you can remove it with ease. In this section, you will install the template, create a new solution, and review the generated code.
Prerequisites
The first step is to ensure you meet the following prerequisites:
Check the .NET Core version by running this command:
dotnet –list-sdks
Check the node version by running this command:
node -v
Next, install the solution template using this command:
dotnet new –install Clean.Architecture.Solution.Template
Create a new solution
Creating a new solution is easy. Within an empty folder, run the following command:
dotnet new ca-sln
The following message will be displayed:
The template “Clean Architecture Solution” was created successfully.
This command will create a new solution, automatically namespaced using the name of the parent folder. For example, if the parent folder is named Northwind, then the solution will be named Northwind.sln, and the default namespace will be Northwind.
The solution is built using the Angular project template with ASP.NET Core. The ASP.NET Core project provides an API back end and the Angular CLI project provides the UI.
Launching the solution from Visual Studio 2019 is trivial, just press F5.
In order to launch the solution using the .NET Core CLI, a few more steps are required. You can learn more by visiting the above link, but I’ll include the information here for completeness.
First, you will need an environment variable named ASPNETCORE_Environment with a value of Development. On Windows, run SET ASPNETCORE_Environment=Development. On Linux or macOS, run export ASPNETCORE_Environment=Development.
Next, run the following command from the solution folder:
cd src/WebUI
dotnet build
NoteThe initial build will take a few minutes, as it will also install required client-side packages. Subsequent builds will be much quicker.
Then run dotnet run to start the application. The following message will be displayed:
Now listening on: https://localhost:port
The port is usually 5001. Open the web site by navigating to https://localhost:port.
NoteYou will also see a message similar to the following:NG Live Development Server is listening on localhost:port, open your browser on https://localhost:portIgnore this message, it’s not the URL for the combined ASP.NET Core and Angular CLI application
If everything was successful you will see the following:
Let’s take a look at the structure of the newly generated solution.
Solution structure
The solution template generates a multi-project solution. For a solution named Northwind, the following folder structure is created:
The project names within src align closely to the layers of the Clean Architecture diagram, the only exception being WebUI, representing the Presentation layer.
The Domain project represents the Domain layer and contains enterprise or domain logic and includes entities, enums, exceptions, interfaces, types and logic specific to the domain layer. This layer has no dependencies on anything external.
The Application project represents the Application layer and contains all business logic. This project implements CQRS (Command Query Responsibility Segregation), with each business use case represented by a single command or query. This layer is dependent on the Domain layer but has no dependencies on any other layer or project. This layer defines interfaces that are implemented by outside layers. For example, if the application needs to access a notification service, a new interface would be added to the Application and the implementation would be created within Infrastructure.
The Infrastructure project represents the Infrastructure layer and contains classes for accessing external resources such as file systems, web services, SMTP, and so on. These classes should be based on interfaces defined within the Application layer.
The WebUI project represents the Presentation layer. This project is a SPA (single page app) based on Angular 8 and ASP.NET Core. This layer depends on both the Application and Infrastructure layers. Please note the dependency on Infrastructure is only to support dependency injection. Therefore Startup.cs should include the only reference to Infrastructure.
Tests
The tests folder contains numerous unit and integration tests projects to help get you up and running quickly. The details of these projects will be explored in a follow-up post. In the meantime, feel free to explore and ask any questions below.
Technologies
Aside from .NET Core, numerous technologies are used within this solution including:
In follow-up posts, I’ll include additional details on how the above technologies are used within the solution.
Additional resources
In this post, I have provided an overview of Clean Architecture and the new solution template. If you would like to learn more about any of these topics, take a look at the following resources:
Thanks for reading. Please post any questions or comments below.