SSW
Hardcoding. Have your cake and eat it
2020-06-01CODING ·SOLID Principles
One of the core principles of software that is drummed into new developers is ‘Don’t Hardcode anything’. What if I told you that it’s OK to hardcode things? What if I told you that in some circumstances hardcoding is the RIGHT way to proceed?.As a junior developer, one of the key principles that were drummed into me was that hardcoding values is a BAD thing (amongst many other principles). But then more often than not, the pressures of deadlines, project managers and product owners don’t afford us the luxury of building an engineered solution the first time around. So we revert to simply hardcoding just to keep everyone happy and deliver a feature. What no one ever mentions is that there are two ways to hardcode values: the RIGHT way and the WRONG way.
I’ve seen developers new in their career, and even some more experienced fall for this trap. This scenario can play out in many different ways, perhaps it’s a Proof of Concept that “will just get thrown away”. Between you and me, rarely is code simply throw away, I’ve heard of too many POC’s that find their way into production.
Put simply, If somethings worth doing its worth doing right. Now, I’m not advocating wasting time implementing an over-engineered solution to prove a concept, or when time constraints (and PMs) don’t allow. What I am saying though is that when done correctly, we can have our cake and eat it too.
The WRONG way
Consider the following scenario: A junior developer has been tasked to implement a shipping cost calculator. Because of the time constraints, and the small target market the Product Owner is insisting that that solution must be simple, and hardcoding is fine, because “we can throw it away and do it properly when we have time”.
Being a junior, and somewhat naive developer they go ahead and implement the solution as follows:
public class ShippingService
{
//As per requirements from Product Owner, Hardcoding countries here, as
//These won’t change anytime soon, and we don’t have time to create a new database,
//and service and the added maintenance overhead.
public Dictionary countries = new Dictionary
{
{“au”,15M},
{“us”, 10M}
};
public decimal CalculateShipping(string country)
{
if (countries.TryGetValue(country.ToLower(), out var cost))
{
return cost;
}
throw new Exception(“Country not implemented yet”);
}
}
Clearly, the developer knows this isn’t the right thing to do, so they spent more time writing a comment justifying their actions… Now, what they don’t realise is that: a. The sales team has sold this feature to another 10 regions b. The Product Owner has identified another 10 different usages for country data, and not all of them are in the shipping service. Oh, and they’ll only tell you about them 1 at a time, over the next few months, to not overwhelm you. c. The backlog is so jam-packed there won’t be any time to go back and refactor any of the Country data anytime soon. Especially when the countries dictionary is so heavily utilised.
The RIGHT way
Luckily a more seasoned developer has had a chance to review the pull-request and offers the following solution:
public class Country
{
public string Name {get;set;}
public decimal ShippingRate {get;set;}
}
public interface ICountryData
{
Country GetCountryByCode(string code);
}
public class CountryData: ICountryData
{
//Hardcoded for now, Ideally provided by database
public Dictionary countries = new Dictionary
{
{“au”,new Country{Name = “Australia”, ShippingRate=15M}},
{“us”,new Country{Name = “United States”, ShippingRate=10M}}
};
public Country GetCountryByCode(string code)
{
if (countries.TryGetValue(code, out var country))
{
return country;
}
return null;
}
}
public class ShippingService
{
private ICountryData _countryData;
public ShippingService(ICountryData countryData)
{
_countryData = countryData;
}
public decimal CalculateShipping(string country)
{
var result = _countryData.GetCountryByCode(country);
if (result == null)
{
return result.ShippingRate;
}
throw new Exception(“Country not implemented yet”);
}
}
Notice that this extra work doesn’t cost much more to write. It doesn’t avoid the hardcoding. It doesn’t worry about databases or external dependencies. It just does the job, in a more ideal way.
Why is this a better solution
Adhering more closely to the SOLID principles we are working toward a more complete solution, as opposed to just solving today’s problem.
We are adhering to the Single Responsibility Principle, whereby the Shipping service isn’t concerned about the storage of country data.
We use the Interface Segregation Principle, along with Dependency Inversion Principle for the ‘ICountryData’ so that at any point in the future (when the budget allows) replacing the implementation won’t affect any of the calling code.
Importantly, the ICountryData interface, and even the Country class, aren’t fully defined just yet. That’s OK. No doubt these contracts will grow and evolve as the system grows. At least now we have somewhere to add this information.
Conclusion
When used in this fashion, hardcoding data can aid in the rapid prototyping of very complex systems. Instead of spending time and effort working on complex algorithms, and storage mechanisms etc, we should be looking to abstract out the complexity behind an interface and hardcode the simplest results. This way, we can move on with the rest of the system, without being blocked by some complexity that is not part of our immediate concern. Kick the can down the road, so to speak.
Using AppSettings in Blazor WebAssembly
While client-side Blazor technically isn’t yet stable, I love working with it more than other web front-end technologies. One significant hiccup I found while developing Cognitive Studio is having environment-sensitive configurations for the application.
I want my application to behave as an application that can live anywhere and is consistent with what we have in traditional .NET Core applications as much as possible.
My current solution is going the official route for AppSettings in Blazor introduced in 3.2 Preview 4 and updated to Blazor 3.2 Release Candidate.
Setup .NET Core Blazor app
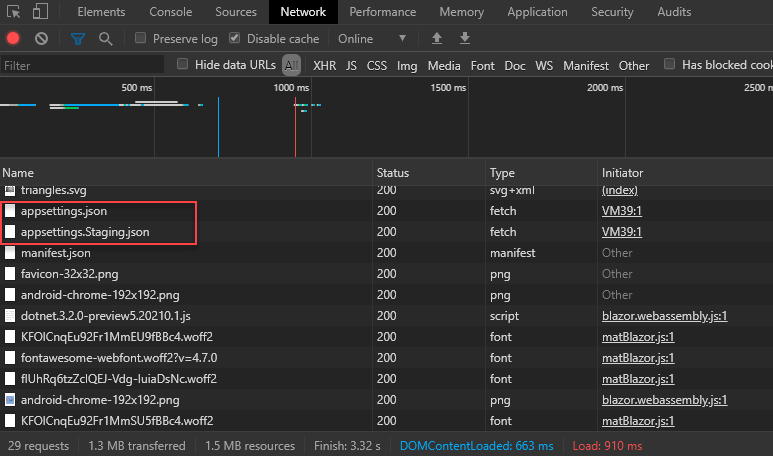
Create appsettings.json and add it to wwwroot folder
Add any additional environment AppSettings like appsettings.Staging.json
Use Configuration
Blazor host already comes with configuration builder as part of WebAssemblyHostBuilder and gets built as well as registered when the host is built.
This means if you try to make your own IConfiguration, WebAssemblyHostBuilder.Build() will override it! Also, if you try to build configuration with WebAssemblyHostBuilder.Configuration.Build(), Blazor app will fail to bootstrap. I believe this is because appsettings.json is read via JS but JS interop isn’t read yet until Blazor app has successfully booted.
To solve this, when you want to use configuration, use lambda expression.
public static async Task Main(string[] args)
{
var builder = WebAssemblyHostBuilder.CreateDefault(args);
builder.RootComponents.Add(“app”);
ConfigureServices(builder.Services);
await builder.Build().RunAsync();
}
public static void ConfigureServices(IServiceCollection services)
{
// Example of loading a configuration as configuration isn’t available yet at this stage.
services.AddSingleton(provider = >
{
var config = provider.GetService();
return config.GetSection(“App”).Get();
});
}
You can also use the following code in Razor pages to access configuration directly.
@inject IConfiguration Configuration
Configure multiple environments
This part is about loading the correct AppSettings. The default appsettings.json is always downloaded, while the appsettings.*.json is downloaded based on the app’s environment.
Currently, the only way to set the Blazor WebAssembly environment is to return HTTP header blazor-environment when requesting blazor.boot.json. Custom HTTP headers are not a big problem if you use a web server to serve your application. In Azure WebApp you can use web.config and other platforms have ways to inject HTTP headers to requested files.
Sadly, GitHub Pages and Azure Blob Storage Websites don’t support custom HTTP Headers.
Yes, you can try to inject an HTTP header inside index.html with the following metadata:
This won’t work because the header needs to be set for blazor.boot.json!
Is to postpone loading Blazor (came with 3.2 Release Candidate) and inject headers in Blazor.start.
In wwwroot/index.html add:
const environmentName = ‘Staging’;
Blazor.start({
loadBootResource: function (type, name, defaultUri, integrity) {
// Adds a custom HTTP header to the outbound requests
// To retain the default integrity checking behavior, it’s necessary to pass through the ‘integrity’ parameter
return fetch(defaultUri, {
cache: ‘no-cache’,
integrity: integrity,
headers: { ‘blazor-environment’: environmentName }
});
}
});
Now all you have to do is to modify environmentName value on deployment and you’ll dynamically download the correct AppSettings! 😁
Special thanks to Steve Sanderson for finding a workaround for the switching environments problem. 🙂
Original issue: https://github.com/dotnet/aspnetcore/issues/20935
UPDATE 1: Added code for DI and accessing configuration.UPDATE 2: Updated how to inject headers in Blazor 3.2 Release Candidate.
EF Core Query Tags and Alternatives
When doing a performance review on client applications (and my friend’s apps), I often see issues related to EF Core and most devs don’t seem to notice them until they spiral out of control. When this happens, they don’t know how to find problematic queries and then link them back to the original code.
In this blog post, I’ll show you a couple of tricks on how to track your queries, so when you need to debug performance issues, you won’t have a problem finding the problematic SQL query as well the code that generates it. You can also skip to the end of the recommended approach.
I’ll assume that you have configured logging in your .NET Core application, but if you need instructions for that, go to ASP.NET Core 3.0 + Serilog. I recommend collecting the logs into Seq and/or Application Insights for later analysis.
Tagging Queries
If you use EF Core 2.2+, you can easily track your queries by tagging them with .TagWith().
var list = await _context.Tweets
.TagWith(“GetTweets”)
.ToListAsync(cancellationToken)
.ConfigureAwait(false);
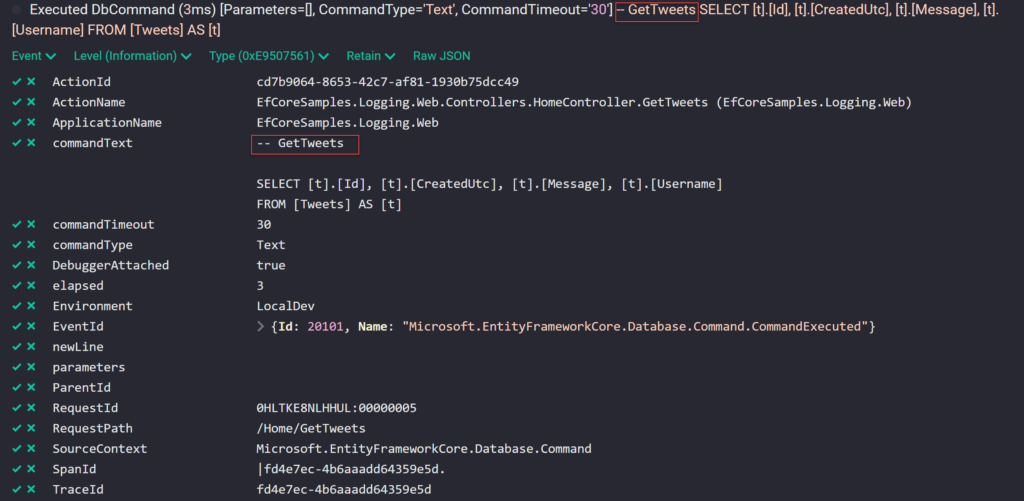
This will add GetTweets into SQL statement, which can be seen in logs and even SQL Profiler.
— GetTweets
SELECT [t].[Id], [t].[CreatedUtc], [t].[Message], [t].[Username]
FROM [Tweets] AS [t]
Figure: We can see the tag as part of the query.
Query Tags are supported to any IQueryable. This includes methods like FromSqlRaw which are now being used to execute store procedures and views as long it inherits from IQueryable.
Sadly adding, updating and removing entities is not supported by Query Tags.
NOTE: For EF6 you can try to use this 3rd party Nuget package: EF6.TagWith
Log Scope
The second approach is to add Log Scope. This approach is great if .TagWith() isn’t available. This could be because you want to log inserts/updates/deletes, you’re running EF Core before version 2.2, legacy EF or even if you don’t have direct access to the queries (like Microsoft Identity).
using (_logger.BeginScope(new Dictionary { { “EFQueries”, “GetTweets” } }))
{
return await _context.Tweets
.ToListAsync(ct)
.ConfigureAwait(false);
}
In this example, I’ll show you how you can indirectly log SQL statements generated by EF Core. To demonstrate that, we’ll need to get an instance of ILogger and then we’ll create a new Log Scope, which propagates to all logs inside that context.
public async Task InsertTweet(string username, string message, CancellationToken ct = default)
{
// This can optionally be in the bellow log scope but is not necessary.
// The tweet is going to be added into SQL DB when `.SaveChanges` is called.
_context.Tweets.Add(new Tweet
{
Username = username,
Message = message
});
using (_logger.BeginScope(new Dictionary { { “EFQueries”, “InsertTweet” } }))
{
// This will make SQL queries to save data into DB.
await _context.SaveChangesAsync(ct).ConfigureAwait(false);
}
}
Figure: Add tweet by adding it to Tweets table.
public async Task InsertTweet(string username, string message, CancellationToken ct = default)
{
using (_logger.BeginScope(new Dictionary { { “EFQueries”, “InsertTweetStoreProc” } }))
{
InsertTweetInternal(username, message);
}
}
private async Task InsertTweetInternal(string username, string message)
{
// This query can also be outside this class and it would still be logged with the “EFQueries” scope.
_ = _context.Tweets
.FromSqlRaw(
“InsertTweet @Username, @Message”,
new SqlParameter(“Username”, username),
new SqlParameter(“Message”, message))
// A hack to make STORE PROC work when they don’t return anything.
.AsNoTracking()
.Select(x = > new { })
.AsEnumerable()
.FirstOrDefault();
}
Figure: Insert Tweets with store procedure.
The above query might get lost if you have a lot of different queries, but by adding a Log Scope, we can search in your preferred rich logger aggregator like Seq or Application Insights for “InsertTweetStoreProc” in property “EFQueries”.
This way, all queries are searchable based on context, find rogue queries and separate your queries from 3rd party queries. Now you can better focus on what queries to optimize or find original code that ran that query.
Recommended approach
Depending on the project, Log Scope might be a better approach since now you can track every SQL query (and other logs) the same way. Use Log Scopes when you know that SQL Server is going to be a problem or visibility is more critical then compact code.
using (_logger.EFQueryScope(“GetTweetsLog”))
{
return await _context.Tweets
.TagWith(“GetTweets + LogContext”)
.ToListAsync(ct)
.ConfigureAwait(false);
}
Small utility for easier logging:
public static class EFCoreLoggingUtils
{
public static IDisposable EFQueryScope(this ILogger logger, string queryScopeName)
{
return logger.BeginScope(new Dictionary { { “EFQueries”, queryScopeName } });
}
public static IDisposable EFQueryScope(this ILogger logger, string queryScopeName)
{
return logger.BeginScope(new Dictionary { { “EFQueries”, queryScopeName } });
}
}
Figure: Logs in Seq with Query Tags and Log Scopes.
In Seq and Application Insights you can find all queries with the following filter SourceContext = “Microsoft.EntityFrameworkCore.Database.Command”. You can then do further filtering based on Log Scope by filtering EFQueries.
You can find source code here: https://github.com/jernejk/EfCoreSamples.Logging
Upgrade the Angular .NET Core SPA Template to Angular 9
Angular 9 has just been released and includes a number of major improvements. Be sure to check the official announcement to learn more. If like me you build single page apps with ASP.NET Core and Angular you will be keen to upgrade. This post details the steps required to upgrade the .NET Core project template to Angular 9.
Prerequisites
Ensure that you meet the following prerequisites:
Creating a new project
Create a Angular .NET Core SPA project from the command-line by running:
dotnet new angular –output AngularSpa –auth Individual
The ASP.NET Core project provides an API back end and the Angular CLI project (contained within ClientApp) provides the front end / SPA.
The output argument specifies the output directory name, and, since no name argument is specified, it is also the name for the new project.
Authentication can be added using the optional auth argument. Specifying Individual creates the project using ASP.NET Core Identity for authenticating and storing users combined with IdentityServer for implementing OIDC.
Build the new solution using the following commands:
cd AngularSpa
dotnet build
The above command restores NuGet / npm dependencies (takes a few minutes) and then builds the entire project.
Next, create a new git repository and commit the initial version using the following commands:
git init
git add .
git commit -m “Initial version”
In the next section, you will upgrade the project to Angular 9.
Upgrade to Angular 9
The process is relatively straightforward, aside from a couple of issues we will cover later. First, switch to the Angular SPA directory (ClientApp):
cd ClientApp
Next, run ng update to update to the latest 8.x version and then commit those changes:
ng update @angular/core@8 @angular/cli@8
git commit -a -m “Update to latest version of Angular 8”
Next, run ng update again to upgrade to Angular 9 and then commit those changes:
ng update @angular/core@9 @angular/cli@9
git commit -a -m “Upgrade to Angular 9”
If everything was successful, you will see the following message:
Your project has been updated to Angular version 9!
For more info, please see: https://v9.angular.io/guide/updating-to-version-9
Don’t get too excited, we are not done yet. You will receive the following error if you attempt to build the Angular project:
Generating ES5 bundles for differential loading…
An unhandled exception occurred: C:CodeScratchAngularSpaClientAppvendor-es2015.js: ‘with’ in strict mode (136749:4)
136747 | Window_run: function _run(code, file) {
136748 | if (file) code += ‘n//@ sourceURL=’ + file;
> 136749 | with(this) eval(code);
| ^
136750 | },
136751 | EventHandlerBuilder_build: function build() {
136752 | try {
See “C:UsersjasonAppDataLocalTempng-MEnshjangular-errors.log” for further details.
You can learn more about this issue here. However to resolve this issue, simply remove the following line from ClientApp/src/main.ts:
export { renderModule, renderModuleFactory } from ‘@angular/platform-server’;
Finally, run ng build and, if successful, commit your changes:
ng build
git commit -a -m “Resolved issue with template”
No further steps required! In the next section, you will launch the project to verify the upgrade was successful.
Launching the project
Normally launching the project is as easy as executing dotnet run, however, if you do so now, you will see the following error:
You can learn more about this issue here. Fortunately, it is easy to resolve this issue. First, open ClientApp/package.json and locate this line:
“start”: “ng serve”,
Then change to include an echo command as follows:
“start”: “echo Starting… && ng serve”,
Easy. Be sure to commit these changes too:
git commit -a -m “Resolved issue #2 with template”
Now launch the project from the root directory using dotnet run. The project will build, start the front and back end, and then display the following message:
Now listening on: https://localhost:5001
Browse to https://localhost:5001 to see the home page of the new project:
That’s it! You are ready to get started developing with Angular 9 and ASP.NET Core 3.1. Thanks for reading, be sure to take a look at some of the other posts in this category. If you did run into any issues, view the sample code for this post. If you can’t figure it out from there, please post a comment below.
Getting started with Form Recognizer (preview)
When I first heard about Form Recognizer, I thought to myself, “Wow, there are so many forms in the real world that needs to be parsed and digitilized!”. Once v2 preview came out, I finally decided to build an app that will parse through all of our user feedback from the last AI Hack Day.
Form Recognizer is an Azure Cognitive Services that allow us to parse text on forms in a structured format. Now we can extract the location and size (bounding box) for where information was entered or written along with the OCR’d text values.
For feedback forms this means, I can get feedback from users by merely uploading their scanned forms to trained custom Form Recognizer.
Prerequisite
In this blog post will attempt to recognize user feedback using Form Recognizer and Form Recognizer to do custom form recognition rather than built-in one.
We’ll need:
Filled out forms
Azure Account
Docker (optional)
Azure Storage Explorer
UPDATE 05/05/2020: The setup process is now automated and you’ll now be able to train and use custom forms much faster than before. 😀
1. Filled out forms
You’ll need at least 6 filled out forms for this demo.As co-organizer of AI Hack Day, I’m using the SSW User Group Evaluation Survey which you can download, fill out, and scan if you don’t have your forms.
Microsoft also have their own data set, if you prefer prefilled: https://github.com/Azure-Samples/cognitive-services-REST-api-samples/blob/master/curl/form-recognizer/sample_data.zip
2. Create Resources
To get started, you can either go to Azure Portal and create a new resource for Form Recognizer or use PowerShell with Azure CLI to create that resource faster. The script will save you about 15 minutes of work and works with existing resources (you can re-run it)!
Find the script on Gist: https://gist.github.com/jernejk/fdb42e032a9568d42dc8c2f05bd1fc13
Run with PowerShell Core (replace the […]):
.create-custom-form-recognizer.ps1 `
-FormRecognizerName [FormsName] `
-StorageAccountName [BlobStorageAccountName] `
-ResourceGroup [ResourceGroupName] `
-StorageAccountSasExpiry “2021-01-01T00:00Z” `
-InstallationType Web
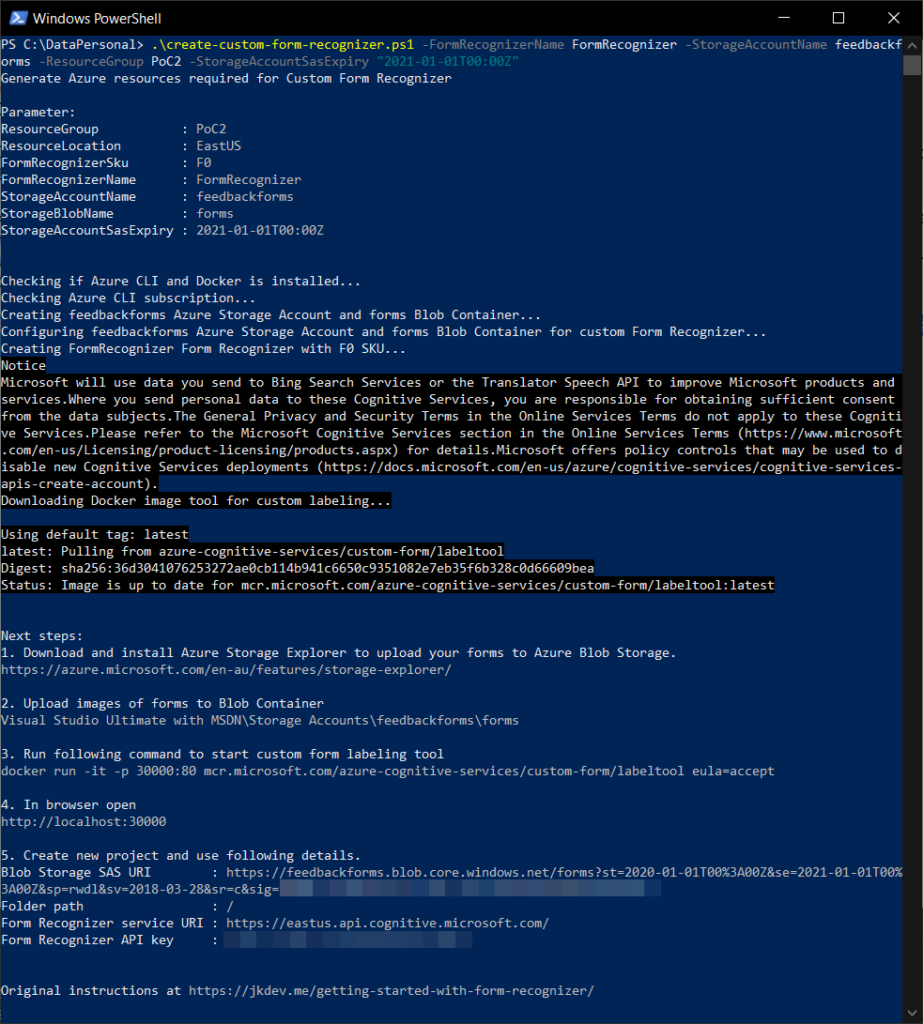
Figure: Example run for Docker configuration.
Run set-executionpolicy unrestricted in admin mode if you don’t have permission to run scripts.
The script will:
Create Azure Blob Storage (name needs to be lowercase)
Correctly configure Azure Blob Storage (CORS and SAS)
Create Form Recognizer
Give you instructions and information required for completing the setup
You can decide how to run the tool by changing -InstallationType argument:
Website hosted by Microsoft -InstallationType Web (default)
Docker Container -InstallationType Docker
Running React app locally from GitHub source -InstallationType Web
If you’re interested how to configure everything from scratch, you can visit Train a Form Recognizer model with labels using the sample labeling tool at Microsoft Docs.
3. Create a project
Whew, that’s a lot of prep work for one service, but now we can start!
Run Form Recognizer Tool via Docker:
docker run -it -p 30000:80 mcr.microsoft.com/azure-cognitive-services/custom-form/labeltool eula=accept
Once running, go to “https://localhost:30000” and let us create a new project.
Add name
“Add Connection”
Add a name for the connection
Copy “Blob Storage SAS URI”
Folder path is empty in this case
Copy “Form Recognizer service uri” and “Form Recognizer API key” from the script results
We finally have our project created!
4. Start labeling
You’ll notice that the project is empty and it doesn’t give you options to upload images. To get your forms in (images or PDF), you’ll have to upload them to the Blob Storage we created for this project. You can use Microsoft Azure Storage Explorer to upload your forms.
TIP: Don’t upload all of your images because you want to leave some of them for testing.
Once they are uploaded, refresh the page on the Form Recognizer Tool.
Wait for OCR to complete
Create tags in the right column you want to recognize (name, email, etc.)
Select the detected text (it will be light green)
Select the correct tag (e.g. “Position”)
The selected text will now have the same color as the tag
Do this for all of the text you want to be tagged on all of the forms.
NOTE: This tool supports only one form per image/PDF. Form with multiple pages will be treated as a single multipage form!
5. Training
Go to Train icon
Click “Train”
Done! 🎉
6. Testing
Go to 2 squares icon
Browse
Predict! 🎉
NOTE: If using are free tier, this may take a while because of the rate limit.
Personally, I’m using PowerAutomate to use Custom Form Recognizer because I can add Form Recognizer as a step in flow with no code. Instead of writting an app, I simply create a button trigger in flow and share that flow with other admins, which allows them to use it on their phone or desktop.
What’s next
The form recognizer works mostly well however, there are a few issues I need to address:
OCR isn’t always great especially if someone’s handwriting isn’t great
This version doesn’t recognize checkboxes (the feature is on their backlog)
When uploading a multipage PDF, it treats it as a single form on multiple pages. We need to split it up into multiple images/PDFs
At the moment I’m experimenting with recognizing checkboxes myself. However, I’m happy that we can quickly get images into structured data and do a bit of correction and add ratings rather than typing everything from scratch. I’m looking forward to the day when our feedback forms for hack days and user groups are automated and we can send feedback to guest speakers much quicker (and enjoying the weekend instead of entering data! 😁).
Clean Architecture with .NET Core: Getting Started
Over the past two years, I’ve travelled the world teaching programmers how to build enterprise applications using Clean Architecture with .NET Core. I started by providing a sample solution using the iconic Northwind Traders database. Recently, I’ve developed a new Clean Architecture Solution Template for .NET Core.
This post provides an overview of Clean Architecture and introduces the new Clean Architecture Solution Template, a .NET Core Project template for building applications based on Angular, ASP.NET Core 3.1, and Clean Architecture.
Let’s start with an overview of Clean Architecture.
Overview
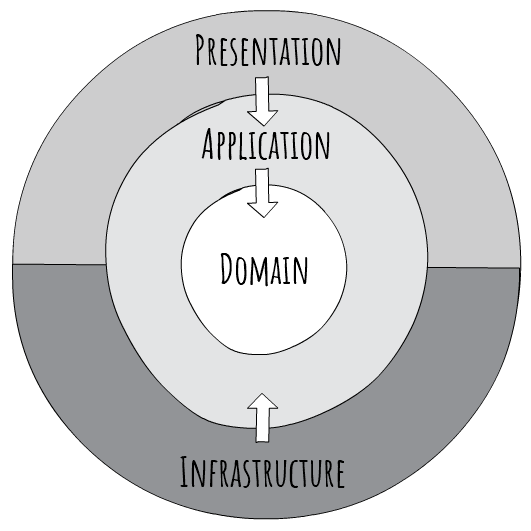
With Clean Architecture, the Domain and Application layers are at the centre of the design. This is known as the Core of the system.
The Domain layer contains enterprise logic and types and the Application layer contains business logic and types. The difference is that enterprise logic could be shared across many systems, whereas the business logic will typically only be used within this system.
Core should not be dependent on data access and other infrastructure concerns so those dependencies are inverted. This is achieved by adding interfaces or abstractions within Core that are implemented by layers outside of Core. For example, if you wanted to implement the Repository pattern you would do so by adding an interface within Core and adding the implementation within Infrastructure.
All dependencies flow inwards and Core has no dependency on any other layer. Infrastructure and Presentation depend on Core, but not on one another.
Figure: Clean Architecture Diagram
This results in architecture and design that is:
Independent of frameworks it does not require the existence of some tool or framework
Testable easy to test – Core has no dependencies on anything external, so writing automated tests is much easier
Independent of UI logic is kept out of the UI so it is easy to change to another technology – right now you might be using Angular, soon Vue, eventually Blazor!
Independent of the database data-access concerns are cleanly separated so moving from SQL Server to CosmosDB or otherwise is trivial
Independent of anything external in fact, Core is completely isolated from the outside world – the difference between a system that will last 3 years, and one that will last 20 years
In the above design, there are only three circles, you may need more. Think of this as a starting point. Just remember to keep all dependencies pointing inwards.
Let’s take a look at a simple approach to getting started with the new Clean Architecture Solution Template.
Solution template
This template provides an awesome approach to building solutions based on ASP.NET Core 3.1 and Angular 8 that follow the principles of Clean Architecture. If Angular is not your thing, worry not, you can remove it with ease. In this section, you will install the template, create a new solution, and review the generated code.
Prerequisites
The first step is to ensure you meet the following prerequisites:
Check the .NET Core version by running this command:
dotnet –list-sdks
Check the node version by running this command:
node -v
Next, install the solution template using this command:
dotnet new –install Clean.Architecture.Solution.Template
Create a new solution
Creating a new solution is easy. Within an empty folder, run the following command:
dotnet new ca-sln
The following message will be displayed:
The template “Clean Architecture Solution” was created successfully.
This command will create a new solution, automatically namespaced using the name of the parent folder. For example, if the parent folder is named Northwind, then the solution will be named Northwind.sln, and the default namespace will be Northwind.
The solution is built using the Angular project template with ASP.NET Core. The ASP.NET Core project provides an API back end and the Angular CLI project provides the UI.
Launching the solution from Visual Studio 2019 is trivial, just press F5.
In order to launch the solution using the .NET Core CLI, a few more steps are required. You can learn more by visiting the above link, but I’ll include the information here for completeness.
First, you will need an environment variable named ASPNETCORE_Environment with a value of Development. On Windows, run SET ASPNETCORE_Environment=Development. On Linux or macOS, run export ASPNETCORE_Environment=Development.
Next, run the following command from the solution folder:
cd src/WebUI
dotnet build
NoteThe initial build will take a few minutes, as it will also install required client-side packages. Subsequent builds will be much quicker.
Then run dotnet run to start the application. The following message will be displayed:
Now listening on: https://localhost:port
The port is usually 5001. Open the web site by navigating to https://localhost:port.
NoteYou will also see a message similar to the following:NG Live Development Server is listening on localhost:port, open your browser on https://localhost:portIgnore this message, it’s not the URL for the combined ASP.NET Core and Angular CLI application
If everything was successful you will see the following:
Let’s take a look at the structure of the newly generated solution.
Solution structure
The solution template generates a multi-project solution. For a solution named Northwind, the following folder structure is created:
The project names within src align closely to the layers of the Clean Architecture diagram, the only exception being WebUI, representing the Presentation layer.
The Domain project represents the Domain layer and contains enterprise or domain logic and includes entities, enums, exceptions, interfaces, types and logic specific to the domain layer. This layer has no dependencies on anything external.
The Application project represents the Application layer and contains all business logic. This project implements CQRS (Command Query Responsibility Segregation), with each business use case represented by a single command or query. This layer is dependent on the Domain layer but has no dependencies on any other layer or project. This layer defines interfaces that are implemented by outside layers. For example, if the application needs to access a notification service, a new interface would be added to the Application and the implementation would be created within Infrastructure.
The Infrastructure project represents the Infrastructure layer and contains classes for accessing external resources such as file systems, web services, SMTP, and so on. These classes should be based on interfaces defined within the Application layer.
The WebUI project represents the Presentation layer. This project is a SPA (single page app) based on Angular 8 and ASP.NET Core. This layer depends on both the Application and Infrastructure layers. Please note the dependency on Infrastructure is only to support dependency injection. Therefore Startup.cs should include the only reference to Infrastructure.
Tests
The tests folder contains numerous unit and integration tests projects to help get you up and running quickly. The details of these projects will be explored in a follow-up post. In the meantime, feel free to explore and ask any questions below.
Technologies
Aside from .NET Core, numerous technologies are used within this solution including:
In follow-up posts, I’ll include additional details on how the above technologies are used within the solution.
Additional resources
In this post, I have provided an overview of Clean Architecture and the new solution template. If you would like to learn more about any of these topics, take a look at the following resources:
Thanks for reading. Please post any questions or comments below.
Retrospective: 2019
Inspired by my friend’s retrospective blog post, I have also decided to make a retrospective. For me, a retro isn’t just about looking at the past and fixing old mistakes, but also to figure out what works and celebrate achievements. You can read my friend’s blog post for a better description of what a retrospective should be and I’ll dive straight into it. 😀
Overall, 2019 felt very short and professionally, I have experienced more growth than in a typical year.
What went well
I presented in soooo many conferences and user groups… 24 in total!
AI Hack Day finally got a green light from my boss and is coming early this (2020) year in Melbourne, Brisbane, and Sydney!
My blog is reaching about 3k views and 900 users per month!
The feedback on presentations is fantastic! For some, my talks are one of the best talks in the conference (DDD, NDC Sydney, Global AI Bootcamp); I’m very humbled to hear that 😁
I found that my talks about ML .NET got a real impact on devs and got me invested into AI even more than I was before
I lived in Melbourne for about 3 months and it was awesome!
Jumpstarted an open-source project Cognitive Studio for exploring Cognitive Services
I traveled a lot and I enjoyed it! I even became a Qantas Silver member for almost free due client work travel
I have been recognized as a speaker and professional by many people. I’m now known for my Real-time facial recognition and ML .NET talks across Australia
Despite imposter syndrome, I realize that the knowledge that I share with others is accepted even by professionals that know the subject significantly better than myself
People like to talk to me after I have delivered my talks and I don’t have to stumble around because of my awkward social skills 🤣
My brother visited me in Melbourne!
Witcher TV series was the best things that happened on TV in 2019, topping Avenger’s Endgame and Rick and Morty
What didn’t go so well
I gained weight (like my friend 😂)
I have traveled so much this year that I want to have a break from travel for a bit (6 months of non-stop travels)
I’m spending too much time on YouTube watching random stuff
Getting my permanent Visa is significantly slower than expected
I still need a lot of time to prepare for talks, even if it’s an existing one. I always try to improve the talk and I put a lot of stress on my self to make sure I don’t mess up the talk
Imposter syndrome is stronger than ever, especially when I talk about ML .NET
I feel like the first half of the year was wasted on YouTube and not doing much. Most of the things I’m proud of started to happen around the middle of the year
I still didn’t upgrade my blog website even though it’s long overdue
What to improve
Lose weight
Travel outside Australia
Have more holidays and relax a little bit
Publish 1-2 blog posts per month
Have 12+ talks in a year
Contribute to the community more effectively
Take care of myself and spend more time with people I care about
Improve social skills with strangers as some know, they aren’t great 🤣
Final thoughts
Last year was an interesting one from many perspectives. I got into my 30s, I became a presenter, lived in a different city for a couple of months, got more positive feedback in one month for several months than I usually get in a year, etc.
On top of that, it charted a new direction for me, teaching devs how they can use AI even if they are not very familiar with the technology. It felt very humbling and rewarding when seeing private messages on Twitter and LinkedIn, people saying they managed to solve their problems because of my talks. As such, William Liebenberg and I managed to create a free event AI Hack Day backed by SSW and more may come before the end of the year.
On the non-professional side, I’m trying to exercise more, improve my diet and trying to find something I would love outside tech so that I’m not glued to screens 24/7. 😁
In short, this year might be the busiest so far and I can’t wait to get started!
Interview – Machine Learning that's ACTUALLY easy with Richard Campbell
Do you want to try machine learning, but don’t want to invest too much time learning a new programming language or some other complicated API or complicated online tools?
Richard Campbell and I are geeking out about why you would want to look at machine learning, how to get started, and what should you know when building your prototype. 🧐
ML.NET Model Builder opens up the world of Machine Learning to all developers.
[embedded content]
I had a blast doing the interview. I hope you’ll enjoy watching it as much as I enjoyed making it! 😁
Updated demo (screenshots)
Here are updated screenshots for ML .NET v1.4 Model Builder.
Figure: Start ML.NET Model Builder Wizzard.
Figure: Select Issue Classification.
Figure: Select file, column to predict (label) and input columns used for prediction.
Figure: Start training.
Figure: See results of training.
Figure: You can try out your model before generating the code.
Figure: Generate the code.
Figure: It generates 2 projects. ConsoleApp is testing purposes and Model project is the one that you can use in your apps.
Figure: In ConsoleApp you can see the usage of ML Model.
Bonus
When using ML .NET Model Builder, it will try to determine if a column should be a hash table or text, which can have a significant impact on your use case. It decides based on the ration of unique and duplicate values and it might choose the wrong type because of that.
However, after generating the code, you can change from a hash table to text and vice versa.
In file ModelBuilder.cs in method BuildTrainingPipeline change the .Append for desired column.
From:
.Append(mlContext.Transforms.Categorical.OneHotHashEncoding(new[] { new InputOutputColumnPair(“Description”, “Description”) }))
To:
.Append(mlContext.Transforms.Text.FeaturizeText(inputColumnName: “Description”, outputColumnName: “Description”))
Figure: Update the Append from Categorical hash to Featurize text.
Retrain model by running ModelBuilder.CreateModel(); in Program.cs. Return right after training because the model hasn’t been copied yet to bin folder.
Figure: Retrain model with feature text instead of categorical hash.
Remove the code from step 2.
NOTE: If your project contains . in it’s name, chances are that the path to the model will be incorrect. (a bug since v1.3) Make sure that path MODEL_FILEPATH in ModelBuilder.cs is correct!
Figure: Model Builder has a bug in generating the right path if project contains a dot in the name.
Publish client-side Blazor to GitHub pages
Lately, I got fascinated by client-side Blazor, as I can build and host a .NET Core application with $0 cost! This is because Blazor only needs to be hosted somewhere on the web and does not require server-side logic.
However, if you try to publish Blazor to GitHub pages, you’ll notice it doesn’t quite work and the official MS documentation is way out of date. I’ll assume you have already created your GitHub Page.
1. Copy files from official Blazor demo
You’ll need to copy 404.html and .nojekyll from Official Blazor demo (yes, almost 2 years ago).
2. Replace content in index.html
In index.html replace your
Simplified Machine Learning for Developers with ML.NET
Recently I’ve been on a tour around Australia presenting about how .NET developers can start with their Machine Learning story in minutes.
I presented at the SSW User Groups (Gold Coast, Brisbane, Melbourne, Canberra, and Sydney), Melbourne ALT .NET User Group, DDD Melbourne and soon at DDD Sydney in just 2 short months. The response was amazing and it truly feels this talk made an impact on many people.
I’m working on making more demos with ML.NET with combination of Model Builder and AutoML while keeping it simple. I’m also working on an AI event with SSW, so stay tuned! 🙂
In the meantime, if you want to learn machine learning simplified for .NET devs, please watch this YouTube video. 🙂
[embedded content]
UPDATE: With help of SSW and William, I’m doing AI HackDay in Melbourne, Brisbane and Sydney next year! (2020)UPDATE 2: Changed the video to be up-to-date. Original video: https://www.youtube.com/watch?v=LG1DHMNT0TA

