
SSW
NDC Oslo 2019 Drones & AI – What's all the buzz about ?
Drones and AI are changing our world.In this session we will look at some of the real world solutions utilising these emerging technologies, you will get an understanding of the core use cases, learn how to get started with the tech, and find out about the pitfalls to avoid when building solutions with drones and Artificial Intelligence.
[embedded content]
ASP.NET Core 3.0 + Serilog
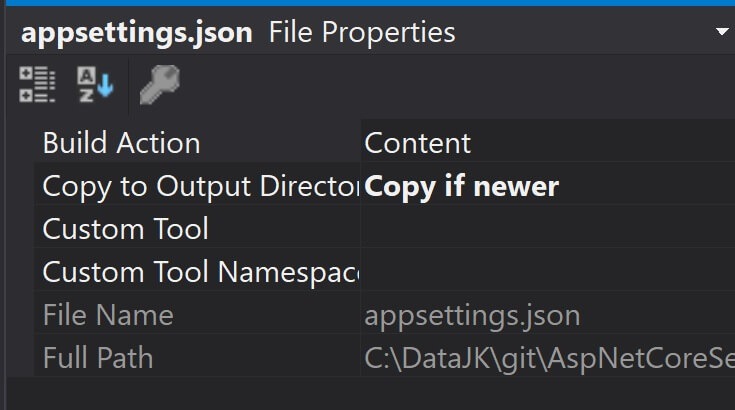
UPDATED TO .NET Core 3.x I have been a great fan of Serilog and Seq for over 2 years and I delivered great value to many of my clients. After many projects of integrating Serilog and Seq into ASP.NET Core applications, I finally found my favorite way to integrate them. There are few things this…
Read MoreContainers – The secret to shipping cloud workloads (Slide deck)
Simple Machine Learning classification with ML.NET (custom code without Model Builder)

TL;DR; check my GitHub project for bank transaction classification. https://github.com/jernejk/MLSample.SimpleTransactionTagging
UPDATE: If you are looking to learn Machine Learning with minimum code and effort, check out Simplified Machine Learning for Developers with ML.NET. The post below was created before ML.NET Model Builder was released and I made a video about it.
Goal
For a long time, I was trying to get into practical machine learning but I found machine learning wasn’t very accessible for most of the devs.
Recently as a challenge, I tried to make a lightning talk, where I tried to explain how to solve a relatable yet usable everyday problem with machine learning in just 15-20 minutes.
For the demo, I have decided to do bank transaction category classification, as this is something I do every week. While I use a financing service Toshl that collects and classifies all of my bank transactions, I still had to spend ~1 hour every week to fix misclassified transactions. I wanted to fix this problem without needing to write a complicated rule engine and machine learning seemed to be the right approach.
For this example, we’ll use .NET Core with ML.NET and a couple of transactions. You can look at https://github.com/dotnet/machinelearning-samples/. We’ll use Multi-class classification, which is perfect for our problem.
My data is coming from the finance app Toshl which already has the correct category labels for each transaction.
Code
First, I started by looking GitHub Issue Labeler and simply modifying its training data to be my transactions. That surprisingly worked pretty well and I have started a new project that was based on that prototype.
After that, I have decided with the following structure for input which was loaded from JSON. Description and transaction type are used as inputs (features) and category as expected result (label).
[DataContract]
public class TransactionData
{
[DataMember(Name = “desc”)]
public string Description { get; set; }
[DataMember(Name = “category”)]
public string Category { get; set; }
[DataMember(Name = “transactionType”)]
public string TransactionType { get; set; }
}
Next data structure is the prediction model. Column name needs to PredictedLabel, while property name can be anything you like.
public class TransactionPrediction
{
[ColumnName(“PredictedLabel”)]
public string Category;
}
I have loaded the data from JSON.Next step is to train a model and save it.This step doesn’t have verification of the model, which is highly recommended but not necessary for ML. (it’s like an integration test for very fragile code)
public class BankTransactionTrainingService
{
public void Train(IEnumerable trainingData, string modelSavePath)
{
var mlContext = new MLContext(seed: 0);
// Configure ML pipeline
var pipeline = LoadDataProcessPipeline(mlContext);
var trainingPipeline = GetTrainingPipeline(mlContext, pipeline);
var trainingDataView = mlContext.Data.LoadFromEnumerable(trainingData);
// Generate training model.
var trainingModel = trainingPipeline.Fit(trainingDataView);
// Save training model to disk.
mlContext.Model.Save(trainingModel, trainingDataView.Schema, modelSavePath);
}
private IEstimator LoadDataProcessPipeline(MLContext mlContext)
{
// Configure data pipeline based on the features in TransactionData.
// Description and TransactionType are the inputs and Category is the expected result.
var dataProcessPipeline = mlContext
.Transforms.Conversion.MapValueToKey(inputColumnName: nameof(TransactionData.Category), outputColumnName: “Label”)
.Append(mlContext.Transforms.Text.FeaturizeText(inputColumnName: nameof(TransactionData.Description), outputColumnName: “TitleFeaturized”))
.Append(mlContext.Transforms.Text.FeaturizeText(inputColumnName: nameof(TransactionData.TransactionType), outputColumnName: “DescriptionFeaturized”))
// Merge two features into a single feature.
.Append(mlContext.Transforms.Concatenate(“Features”, “TitleFeaturized”, “DescriptionFeaturized”))
.AppendCacheCheckpoint(mlContext);
return dataProcessPipeline;
}
private IEstimator GetTrainingPipeline(MLContext mlContext, IEstimator pipeline)
{
// Use the multi-class SDCA algorithm to predict the label using features.
// For StochasticDualCoordinateAscent the KeyToValue needs to be PredictedLabel.
return pipeline
.Append(GetScadaTrainer(mlContext))
.Append(mlContext.Transforms.Conversion.MapKeyToValue(“PredictedLabel”));
}
private IEstimator GetScadaTrainer(MLContext mlContext)
{
return mlContext.MulticlassClassification.Trainers.SdcaMaximumEntropy(“Label”, “Features”);
}
}
The code below will load the model and predict the category.
public class BankTransactionLabelService
{
private readonly MLContext _mlContext;
private PredictionEngine _predEngine;
public BankTransactionLabelService()
{
_mlContext = new MLContext(seed: 0);
}
public void LoadModel(string modelPath)
{
ITransformer loadedModel;
using (var stream = new FileStream(modelPath, FileMode.Open, FileAccess.Read, FileShare.Read))
loadedModel = _mlContext.Model.Load(stream, out var modelInputSchema);
_predEngine = _mlContext.Model.CreatePredictionEngine(loadedModel);
}
public string PredictCategory(TransactionData transaction)
{
var prediction = new TransactionPrediction();
_predEngine.Predict(transaction, ref prediction);
return prediction?.Category;
}
}
And that’s all from machine learning!
Let’s see how everything comes together.
public static void Main(string[] args)
{
// Some manually chosen transactions with some modifications.
Console.WriteLine(“Loading training data…”);
var trainingData = JsonConvert.DeserializeObject(File.ReadAllText(“training.json”));
Console.WriteLine(“Training the model…”);
var trainingService = new BankTransactionTrainingService();
trainingService.Train(trainingData, “Model.zip”);
Console.WriteLine(“Prepare transaction labeler…”);
var labelService = new BankTransactionLabelService();
labelService.LoadModel(“Model.zip”);
Console.WriteLine(“Predict some transactions based on their description and type…”);
// Should be “coffee & tea”.
MakePrediction(labelService, “AMERICAN CONCEPTS PT BRISBANE”, “expense”);
// The number in the transaction is always random but it will work despite that. Result: rent
MakePrediction(labelService, “ANZ M-BANKING PAYMENT TRANSFER 513542 TO SPIRE REALITY”, “expense”);
// In fact, searching just for part of the transaction will give us the same result.
MakePrediction(labelService, “SPIRE REALITY”, “expense”);
// If we change the transaction type, we’ll get a reimbursement instead.
MakePrediction(labelService, “SPIRE REALITY”, “income”);
}
private static void MakePrediction(BankTransactionLabelService labelService, string description, string transactionType)
{
string prediction = labelService.PredictCategory(new TransactionData
{
Description = description,
TransactionType = transactionType
});
Console.WriteLine($”{description} ({transactionType}) = > {prediction}”);
}
In the above example, we tried to identify a coffee shop, rent in 2 different ways and a reimbursement coming from the same description as rent. With machine learning, we can now predict category even if it’s not completely correct, almost like a fuzzy search.
Conclusion
In conclusion, it took me 2 hours to write my initial prototype and about 4 hours to clean up incorrect data. (I’m working with 1k+ real transactions) The results are very good with about 95% accuracy!
With ML.NET most of the work is in selecting the right machine learning configuration and preparing test data. For example, description and transaction type are great features for predicting labels. In contrast, adding features like amount, date/time which more often than not is not directly linked to the label, may result in predictions to be way off or unable anything at all.
In the past, I have made a few attempts to classify my transactions via a rule engine and failed to deliver great long term value with few days of work. The project was abandoned because the projected effort of maintaining the rules was too great.
AI on Drones – Case Study Overview
It is a great time to be a technologist. I am spending lots of my time at the moment thinking about drones, AI & IOT, about where these technologies intersect, and where they can help people.I was very happy when I got asked today to do a quick 10 minute presentation on ‘Where are we at with drones’.
Rather than just deliver it once I thought I’d capture some thoughts here.
eSmart Systems – Using drones for power line inspection
Maintenance of electrical grids is not only time consuming and costly, but it can also be very dangerous. By developing a connected drone that uses AI and cognitive services from Microsoft Azure, utility companies can reduce blackouts and inspect power lines more safely.
[embedded content]
Microsoft FarmBeats -Uses drones, AI and IOT Edge to increase farm productivity
Microsoft FarmBeats aims to enable farmers to increase farm productivity and reduce costs by enabling data-driven farming.
A new partnership between Microsoft and leading drone maker DJI builds on the work both companies are doing with data and agriculture that could make it easier and more affordable for farmers to quickly get the information they need to make crucial decisions about soil moisture and temperature, pesticides and fertilizer. Hours and days spent walking or driving the fields to try to detect problems can be eliminated. Since 2011, farmer Sean Stratman has grown kale, cauliflower, broccoli and squash in Carnation, Washington. Then, a few years ago, he added a new crop to his bounty: knowledge, using drones and the intelligent edge to get near-real-time information about issues like soil moisture and pests. It’s the kind of information that is not only helping him, but could benefit farmers around the world. Source:
[embedded content]
Links: More reading on FarmBeats
Project Premonition – Using drones to fight infectious diseases
Emerging infectious diseases such as Zika, Ebola, Chikungunya and MERS are dangerous and unpredictable. Public health organizations need data as early as possible to predict disease spread and plan responses. Yet early data is very difficult to obtain, because it must be proactively collected from potential disease sources in the environment. Researchers estimate between 60 and 75% of emerging infectious diseases originate from animals, which are very difficult to monitor.
Project Premonition aims to detect pathogens before they cause outbreaks — by turning mosquitoes into devices that collect data from animals in the environment.
It does this by
Full Article available here More Info here
Teaching Drones to Aid Search and Rescue efforts via Cognitive Services
InDro Robotics, a drone operating outfit based in Salt Spring Island British Columbia, recently connected with Microsoft to explore how they could better enable their drones for search and rescue efforts.
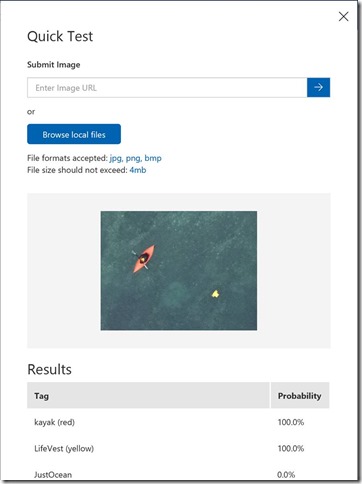
Leveraging Custom Vision Cognitive Service and other Azure services, including IoT Hub, InDro Robotics developers can now successfully equip their drones to:
Identify objects in large bodies of water, such as life vests, boats, etc. as well as determine the severity of the findings
Recognize emergency situations and notify control stations immediately, before assigning to a rescue squad
Establish communication between boats, rescue squads and the control stations. The infrastructure supports permanent storage and per-device authentication
Full article available here
More info
If you are interested in other use cases or info on drones I keep a scratch pad on drone tech in my FAQs collection on drones.
If you are doing something awesome with Drones, AI and Azure please reach out. I would love to chat !
Azure DevOps Pipelines Workshop & Demo Scripts
I recently ran a hands-on workshop about how to build Azure Pipelines for ‘build’ and ‘release’.Pipelines are great as the allow you to automate your builds and deployments so you spend less time with the nuts and bolts, and more time being creative.
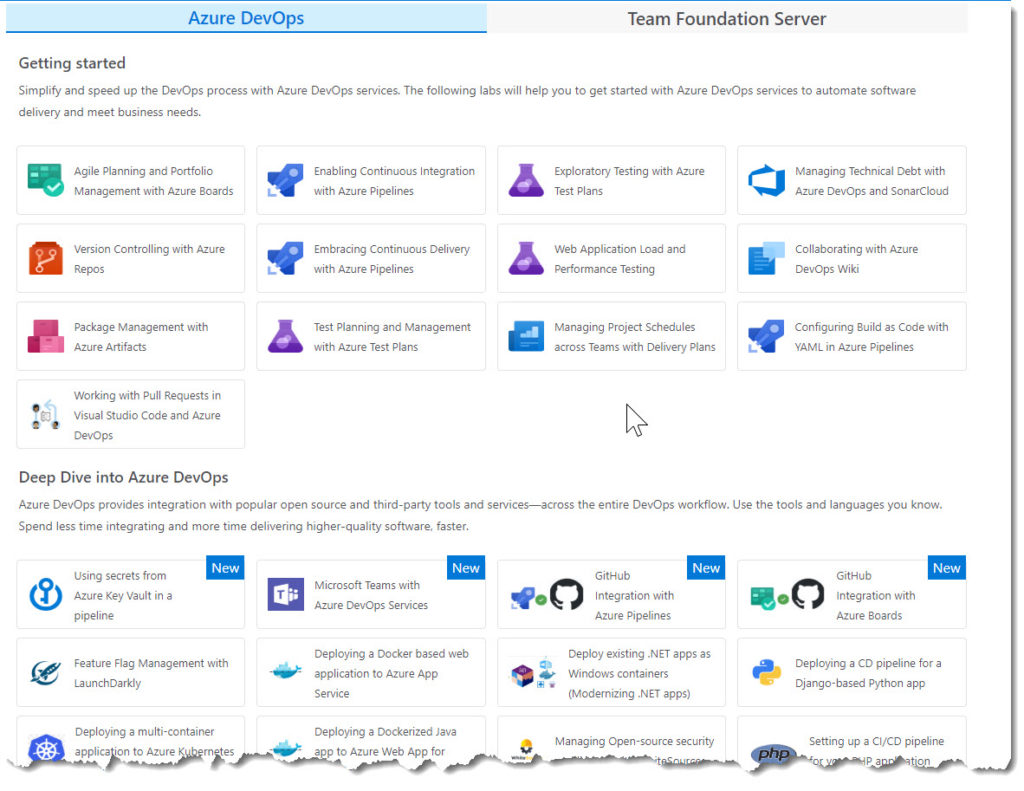
The materials put together by the Azure DevOps team are fantastic and cover a very broad range of topics.
You can get them here https://www.azuredevopslabs.com.
Demo Scripts (In-Progress)
Here is an overview of what I covered on the day and some basic notes I use for when I demo the day (to save me looking up the complete docs).
Tip: After you have followed the step by step instructions – see if you can complete the task again just following my demo script notes.
Exercise 1a: Enabling Continuous Integration with Azure Pipelines
Source: https://www.azuredevopslabs.com/labs/azuredevops/continuousintegration/
Exercise 1b: Configuring Builds as Code with YAML in Azure Pipelines
Source: https://www.azuredevopslabs.com/labs/azuredevops/yaml/
Task 1: Setting up Azure resources
Disable the CI trigger for the default build definition. Edit
Triggers
Enabled
Save
Task 2: Adding a YAML build definition
Repos | Files | New File | ‘azure-pipelines.yml’
Azure DevOps will automatically create a definition when you add this file to root of repo.
Add the yaml below and commit.
steps:
– script: echo hello world
Go to Pipelines
Build
Start the build
View the last build step.
Task 3: Crafting sophisticated YAML definitions
You can even export existing build definitions as YAML if you would prefer to manage them in code.
Builds
PartsUnlimitedE2E
Edit
View YAML
Copy to clipboard
Open our ‘azure-pipelines.yml’ and paste in contents. Commit changes
Note: In the comment blog: The SymbolPath reference is coincidental (it’s a literal needed for the build), but the BuildPlatform and BuildConfguration variables will play a role later.
Pipelines | Build | Open the new build to follow its progress. It will be successful but report there were no tests – there should have been. we will work out the problem.
Build | Logs tab | Test Assemblies task Note that there is a warning that the test assembly pattern didn’t find any matches. Upon closer inspection, it appears that it was expecting a build variable for BuildConfiguration to be available, but since it wasn’t, the platform simply used the text as-is. This was something we probably should have expected given the warnings in the YAML.
Edit build | Variables | Add |
“BuildPlatform”
“any cpu”
“BuildConfiguration”
“release”
Check the ‘Settable at queue time’ option for each
Triggers tab
Note that you can override the YAML settings and configure CI like web-based builds
Save and Queue
Check the tests. All good.
Exercise #2 Embracing Continuous Delivery with Azure Pipelines
Source: https://www.azuredevopslabs.com/labs/azuredevops/continuousdeployment/
Task 1 Setting up Azure Resources
Create a SQL Database (if you haven’t already made it)
database name: partsunlimited
source: blank database
server name: -partsunlimited
2.Create a web app (if you haven’t already made it)
app name: -partsunlimited-qa
resource group & subscription: same as previous
app service plan: accept the defaults
OS: Windows
App Insights: Off
Task 2: Creating a continuous release to the QA state
open a new browser tab for Azure DevOps https://dev.azure.com/YOURACCOUNT/Parts%20Unlimited.
Navigate to Pipelines
Releases
Delete the existing PartsUnlimitedE2E release pipeline
Create a new release pipeline
template: Azure App Service Deployment
default stage: QA
pipeline name: PUL-CICD
artifact: Build | PartsUnlimitedE2E
QA environment task | select QA web app
Turn on CI trigger
Add a build branch trigger > “The build pipeline’s default branch”
Save
Task 3: Configuring the Azure app services for CD
Open the SQL Database – get the db connection strings
Copy the ADO.NET string to your clipboard.
Update username and password in the connection string with SQL credentials
Open the QA app service | Application Settings | Connection Strings
DefaultConnectionString:
Click Save
Repeat for Prod web app
Task 4: Invoking a CD release to QA
Open Azure Devops Repos tab in a new browser tab
Edit PartsUnlimited-aspnet45/src/PartsUnlimitedWebsite/Views/Shared/_Layout.cshtml.
//add v2.0 text after the image
v2.0
Commit changes
Open the build that is kicked off > follow until completion
Open the release > follow it until completion
Navigate to the QA Site > .azurewebsites.net
Check that it now says ‘v2.0’ after the image
Task5: Creating a gated release to the production stage
We are including both automated quality gates as well as a manual approver gate. We will make it our policy that the QA deployment cannot be considered a success until all critical bugs have been resolved.
Open the Release pipeline. Clone the QA stage.
Apply post-deployment considitions on QA gate
Enable the Gates option
Change ‘Delay before evaluation’ to 0
Add ‘Query Work Items’ Deployment gates
Query > Shared Queries
Critical Bugs
Evuation options > Time between re-evaluation of gates to 5.
Rename ‘Copy of QA’ to Prod
Add Pre-deployment approvals > add yourself as an Approver
Click the Prod job > change the app service name to be the Prod web app
Save the pipeline
Edit PartsUnlimited-aspnet45/src/PartsUnlimitedWebsite/Views/Shared/_Layout.cshtml. Change v2.0 to v3.0
Follow the release through to QA. It will fail. Click the View post-deployment gates button.
In a new tab open ‘Boards
Queries
Shared Queries
Critical Bugs’ to locate the bug
Open the bug and mark it as Done. Click Save. (Usually we’d actually fix the bug ;-))
Return to release tab. After approx 5 mins Azure DevOps will check the query again. Once it does, the bugs will be cleared and the release will be approved. You can then click Approve to approve deployment to production.
Confirm the release and watch it, and then check the prod website
Task 6: Working with deployment slots
The most common scenario for using a deployment slot is to have a staging stage for your application to run against productions services, but without replacing the current production application. If the staging deployment passes review, it can immediately be “swapped” in as the production slot with the click of a button. As an additional benefit, the swap can be quickly reversed in the event an issue is uncovered with the new build.
Open the prod app service > Deployment Slots > Add Slot > ‘staging’ with ‘Config Source’ as the current deployment. Note: the ‘production’ slot is considered a ‘default’ and is not shown as a separate slot
Edit the Azure DevOps Prod stage pipeline > Select ‘Deploy Azure App Service’ task >
Select Deploy to slot > choose ‘staging’. Click Save
Commit a change to ‘v4.0’. Follow pipeilne through and approve release.
Refresh browser tab for Prod website – > Still v3.0
Open a new tab to the staging slot…. ‘https://-staging.azurewebsites.net
Return to the App Service in Azure Portal. Deployment Slots > Swap > OK (with defaults)
Refresh prod browser window – > v4.0
Note: Note that if your apps rely on slot-level configuration settings (such as connection strings or app settings marked “slot”), then the worker processes will be restarted. If you’re working under those circumstances and would like to warm up the app before the swap completes, you can select the Swap with preview swap type.
Exercise #3 GitHub integration with Azure Pipelines
Source: https://www.azuredevopslabs.com/labs/vstsextend/github-azurepipelines/
Understanding the Enterprise Bot Template
This is my version of the how bots work doco page, customised to explain the Enterprise Bot Template.
The reason that I have done my own version is that for me I’d rather read well commented (overly commented) code to understand how something works than reading a paragraph of text, then associating it with code.
Sources
Bot Class
public class EnterpriseBotSample : IBot
{
private readonly BotServices _services;
private readonly ConversationState _conversationState;
private readonly UserState _userState;
private readonly IBotTelemetryClient _telemetryClient;
private DialogSet _dialogs;
The main bot logic is defined in the EnterpriseBotSample class that derives from the IBot interface.
IBot defines a single method OnTurnAsync.
OnTurnAsync
public async Task OnTurnAsync(ITurnContext turnContext, CancellationToken cancellationToken = default(CancellationToken))
OnTurnAsync: updated with my code comments. I wouldn’t usually write this many comments in code 😉
// Turncontext provides information about the incoming activity.
public async Task OnTurnAsync(ITurnContext turnContext, CancellationToken cancellationToken = default(CancellationToken))
{
//The incoming activity corresponds to the inbound HTTP request.
// Activities can be of various types, so we check to see if the bot has received a message.
if (turnContext.Activity.Type == ActivityTypes.Message)
{
//If it is a message, we get the conversation state from the turn context, increment the turn counter, and then persist the new turn counter value into the conversation state.
// Get the conversation state from the turn context.
var oldState = await _accessors.CounterState.GetAsync(turnContext, () = > new CounterState());
// Bump the turn count for this conversation.
var newState = new CounterState { TurnCount = oldState.TurnCount + 1 };
// Set the property using the accessor.
await _accessors.CounterState.SetAsync(turnContext, newState);
// Save the new turn count into the conversation state.
await _accessors.ConversationState.SaveChangesAsync(turnContext);
// And then send a message back to the user using SendActivityAsync call.
// The outgoing activity corresponds to the outbound HTTP request.
// Echo back to the user whatever they typed.
var responseMessage = $”Turn {newState.TurnCount}: You sent ‘{turnContext.Activity.Text}’n”;
await turnContext.SendActivityAsync(responseMessage);
}
else
{
await turnContext.SendActivityAsync($”{turnContext.Activity.Type} event detected”);
}
}
Set up services
The ConfigureServices method in the startup.cs file
is where .NET Core configure Dependency Injection as per the docs
it loads the connected services from .bot file,
catches any errors that occur during a conversation turn and logs them,
sets up your credential provider and
creates a conversation state object to store conversation data in memory.
services.AddBot(options = >
{
// Creates a logger for the application to use.
ILogger logger = _loggerFactory.CreateLogger();
var secretKey = Configuration.GetSection(“botFileSecret”)?.Value;
var botFilePath = Configuration.GetSection(“botFilePath”)?.Value;
// Loads .bot configuration file and adds a singleton that your Bot can access through dependency injection.
BotConfiguration botConfig = null;
try
{
botConfig = BotConfiguration.Load(botFilePath ?? @”.BotConfiguration.bot”, secretKey);
}
catch
{
//…
}
services.AddSingleton(sp = > botConfig);
// Retrieve current endpoint.
var environment = _isProduction ? “production” : “development”;
var service = botConfig.Services.Where(s = > s.Type == “endpoint” && s.Name == environment).FirstOrDefault();
if (!(service is EndpointService endpointService))
{
throw new InvalidOperationException($”The .bot file does not contain an endpoint with name ‘{environment}’.”);
}
options.CredentialProvider = new SimpleCredentialProvider(endpointService.AppId, endpointService.AppPassword);
// Catches any errors that occur during a conversation turn and logs them.
options.OnTurnError = async (context, exception) = >
{
logger.LogError($”Exception caught : {exception}”);
await context.SendActivityAsync(“Sorry, it looks like something went wrong.”);
};
// The Memory Storage used here is for local bot debugging only. When the bot
// is restarted, everything stored in memory will be gone.
IStorage dataStore = new MemoryStorage();
// …
// Create Conversation State object.
// The Conversation State object is where we persist anything at the conversation-scope.
var conversationState = new ConversationState(dataStore);
options.State.Add(conversationState);
});
Startup.cs – configuring state
Note: this is different to the getting started doc. It works differently in the enterprise template – we aren’t configuring the stateaccessors in the ConfigureServices method
Understanding state
var dataStore = new CosmosDbStorage(cosmosOptions);
var userState = new UserState(dataStore);
var conversationState = new ConversationState(dataStore);
services.AddSingleton(dataStore);
services.AddSingleton(userState);
services.AddSingleton(conversationState);
services.AddSingleton(new BotStateSet(userState, conversationState));
startup.cs – Configure method
The Configure method finishes the configuration of your app by specifying that the app use the Bot Framework and a few other files. All bots using the Bot Framework will need that configuration call. ConfigureServices and Configure are called by the runtime when the app starts.
public void Configure(IApplicationBuilder app, IHostingEnvironment env)
{
if (env.IsDevelopment())
{
app.UseDeveloperExceptionPage();
}
app.UseBotApplicationInsights()
.UseDefaultFiles()
.UseStaticFiles()
.UseBotFramework();
}
The bot file
The .bot file contains information, including the endpoint, app ID, and password, and references to services that are used by the bot. This file gets created for you when you start building a bot from a template, but you can create your own through the emulator or other tools. You can specify the .bot file to use when testing your bot with the emulator.
{
“name”: “echobot-with-counter”,
“services”: [
{
“type”: “endpoint”,
“name”: “development”,
“endpoint”: “https://localhost:3978/api/messages”,
“appId”: “”,
“appPassword”: “”,
“id”: “1”
}
],
“padlock”: “”,
“version”: “2.0”
}
State
– User state is available in any turn that the bot is conversing with that user on that channel, regardless of the conversation
– Conversation state is available in any turn in a specific conversation, regardless of user (i.e. group conversations)
– Private conversation state is scoped to both the specific conversation and to that specific user
Source: Managing State
public class OnboardingDialog : EnterpriseDialog
{
private static OnboardingResponses _responder = new OnboardingResponses();
private IStatePropertyAccessor _accessor;
private OnboardingState _state;
public OnboardingDialog(BotServices botServices, IStatePropertyAccessor accessor, IBotTelemetryClient telemetryClient)
: base(botServices, nameof(OnboardingDialog))
{
_accessor = accessor;
InitialDialogId = nameof(OnboardingDialog);
var onboarding = new WaterfallStep[]
{
AskForName,
AskForEmail,
AskForLocation,
FinishOnboardingDialog,
};
// To capture built-in waterfall dialog telemetry, set the telemetry client
// to the new waterfall dialog and add it to the component dialog
TelemetryClient = telemetryClient;
AddDialog(new WaterfallDialog(InitialDialogId, onboarding) { TelemetryClient = telemetryClient });
AddDialog(new TextPrompt(DialogIds.NamePrompt));
AddDialog(new TextPrompt(DialogIds.EmailPrompt));
AddDialog(new TextPrompt(DialogIds.LocationPrompt));
}
public async Task AskForName(WaterfallStepContext sc, CancellationToken cancellationToken)
{
_state = await _accessor.GetAsync(sc.Context, () = > new OnboardingState());
if (!string.IsNullOrEmpty(_state.Name))
{
return await sc.NextAsync(_state.Name);
}
else
{
return await sc.PromptAsync(DialogIds.NamePrompt, new PromptOptions()
{
Prompt = await _responder.RenderTemplate(sc.Context, sc.Context.Activity.Locale, OnboardingResponses.ResponseIds.NamePrompt),
});
}
}
Dialogues
See the docs
Gathering user input via Dialogues
Enterprise Bot Workshop Agenda (draft)
This is a draft agenda for the bot workshops that Valeriia and I run with our customers.
I intend to flesh this out and improve it as we run more and more.
Demo of the Enterprise Bot Template
Enterprise Bot Template Architecture Discussion
Intro to LUIS
configure global LUIS Intents
configure app specific LUIS Intents
Intro to QnA Maker
configure global QnA Maker
configure app specific QnA Maker
Intro to the Dispatcher
wiring together the LUIS & QnA Maker docs
Installing the Enterprise Bot Template
Deploying the Enterprise Bot Template
Deploying your bot
Customise the Enterprise Template
Customise the template
Review Project Structure
Update Intro Message
Update Bot Responses
(skip updating cognitive models – already done)
Add a new dialog
View bot analytics & Telemetry
Code inspection
Typing indicators
Language support
Transcripts
Consuming external APIs
Configure Authentication
images from https://docs.microsoft.com/en-us/azure/bot-service/bot-builder-concept-dialog?view=azure-bot-service-4.0
Resources:
Setup Requirements
The requirements for the Enterprise Bot Template (as per https://docs.microsoft.com/en-us/azure/bot-service/bot-builder-enterprise-template-deployment?view=azure-bot-service-4.0 )
Enterprise Template Bots require the following dependencies for end to end operation.
Azure Web App
Azure Storage Account (Transcripts)
Azure Application Insights (Telemetry)
Azure CosmosDb (Conversation State storage)
Azure Cognitive Services – Language Understanding
Azure Cognitive Services – QnA Maker (includes Azure Search, Azure Web App)
Azure Cognitive Services – Content Moderator (optional manual step)
Deploy the Enterprise Template before the workshop
Because the workshop covers a lot of ground, it is best if before the workshop a developer on the project follows the Create, Customise and Deploy steps for the bot template.
The instructions are very straight forward and clear. Once this is done – in the workshop we can spend time explaining the code and best practices as opposed to going through the exact steps in the doco.
Create the project https://docs.microsoft.com/en-us/azure/bot-service/bot-builder-enterprise-template-create-project?view=azure-bot-service-4.0
Customer the template https://docs.microsoft.com/en-us/azure/bot-service/bot-builder-enterprise-template-customize?view=azure-bot-service-4.0
Deploy the template https://docs.microsoft.com/en-us/azure/bot-service/bot-builder-enterprise-template-deployment?view=azure-bot-service-4.0
I’m looking forward to building a bot together !
Lessons from a successful project
2019-03-08PERSONAL ·Project Lessons Success
Lessons learnt after recently completing a successful projectA colleague and I recently finished a short 3-week project with a client, the result of which is one very happy client, and an MVP finished before the deadline. Below are the lessons that I learnt during that project.
Success
First, let me define success in this situation.
Completing the Minimum Viable Product feature set within the strict budget constraints set by the client.
A product the end-user can easily use
Intuitive integration points that just work
A Happy client
I for one was extremely surprised with the result, as going into it I still wasn’t 100% sure what the final implementation would look like, and even though the estimates from the spec review suggested it would be possible, I was still worried.
From an architectural and technology point of view, there wasn’t anything tricky, this was a standard UI and API. Given our tight time constraints, and also the great feedback from Jason Taylor’s Clean Architecture video, this was where we started. https://github.com/JasonGT/NorthwindTraders. This is a well laid out and easy to understand implementation of the clean architecture pattern.
DON’T Start from scratch
Thanks Jason for the hard work, I was expecting to spend days or more on building a base framework, but having this reference meant it was pretty much done within the first day. However simply cutting and pasting the code isn’t enough, being familiar with how and why it works is even more important, especially the Nswag integration as it isn’t obvious to start with. If you are unsure, I’m happy to answer questions, as I assume Jason would be too. This also goes for the UI, Leveraging past projects to have a basic UI template, Angular (No Ngrx on this one) + FlexLayout + Angular material + Nswag also helped with lesson 2 below. Note: Starring Jason’s Repo, and publicly acknowledging/thanking him (eg twitter) is not only a nice thing to do, but it also helps Jason realise the positive impact he has on our community. This goes for all resources you find helpful.
Lesson 1: Use (and understand) a reference architecture, don’t waste time starting from scratch. If one doesn’t exist CREATE One just as Jason did
Lesson 1a: If you do use someone’s reference, acknowledge them and thank them, let them know how it helped, it’s easy to do, it’s free, and it’s the nice thing to do. Preferably publicly, so their hard work gets noticed, otherwise privately at the very least, so they know they have helped out in some way.
Get the UI up and running before the first demo, and validate early
As the project was moving along at a rapid pace, and we were also aware of the limited time/budget for the project, we made a point of ensuring there was some form of UI available for our first sprint demo, to ensure the UI was on the right path, and to ensure the client felt like there was progress.
Lesson 2: Validate your UI design with the Product Owner as soon as you have something to show, and make sure you can demo at first sprint review
Don’t underestimate the Bureaucratic processes of large enterprises
As much as we put an emphasis on getting DevOps up and running within the first sprint, We (well I) severely underestimated the complexity involved in getting environments set up in a large bureaucratic enterprise, it wasn’t until the second last day before we eventually got an automated deployment to a staging environment. We decided to finish up early, to save some time up our sleeve, to allow for user testing, before going live.
Lesson 3: When dealing with a large organisation try to get someone from the infrastructure/provisioning team allocated to your project in the early days, to get the environments up and running as soon as possible.
Lesson 3a: Have a backup plan, If needed use your free Azure credits, so the client can test early.
Communication
We were fortunate enough to have good access to the Product Owner and the Domain experts that we needed to integrate with. The discussions we had between Us and the PO (non-technical); Us and Integration team (Technical) and even between ourselves, resulted in catching incorrect assumptions before they became difficult to rectify, or helped clarify (and alleviate) some concerns the Product Owner may have had, and also meant that our integrations went very smoothly even though we had limited opportunity to test this early.
Lesson 4: Communicate with EVERYONE more than you think is necessary.
Lesson 4a: Spend time educating a Non-Technical Product Owner as to the “WHY” things are implemented the way they are, don’t get bogged in the “HOW”. The client mentioned their appreciation of this on more than one occasion
Lesson 4b: Technical resources from the client may not be as experienced, the time spent educating them on the “HOW” and the “WHY” will help maximise the likelihood of successful integrations
Lesson 4c: Technical conversations/discussions/arguments, whiteboarding amongst the technical team is invaluable, and only benefit the project
Closing thoughts
Of all of these lessons, I cannot understate that 4a, Taking the time to explain and discuss with the Product Owner your decisions in a non-technical manner was by far, the most valuable lesson, and resulting in a client that was extremely happy throughout the process, so much so, that there is already talk of a follow up project orders of magnitude larger than this.
Even though the timeframes and the environment provided us with our fair share of challenges and stresses (don’t they all), hitting all of our milestones and working so closely with the client helped ensure that this was not only a successful project, but we had fun along the way. Best of all, I learnt plenty, especially the non-technical stuff.
GetHashCode() the easy way
2019-03-06CODING ·c# GetHashCode VS2017 VS2019 .Net
Remembering the most appropriate way to calculate a hashcode was always difficult. But not anymoretl;dr
Let Visual Studio generate your overrides for Equals() and GetHashCode() so you don’t need to remember the best practices.
Don’t roll your own GetHashCode() algorithm or even rely on StackOverflow, use the .net framework to work it out for you..
HashCode.Combine(Long, Lat, Altitude);
Background
When trying to check the equality of reference objects in c# we simply cannot apply the ‘==’ operator, as this will only compare memory locations and not data.
To get around this every object implements both the Equals() and GetHashCode() methods. According to MSDN The purpose of GetHashCode() is:
The GetHashCode method provides this hash code for algorithms that need quick checks of object equality.
The main points to take into consideration when calculating the hash code are:
A hash function must have the following properties:
If two objects compare as equal, the GetHashCode() method for each object must return the same value. However, if two objects do not compare as equal, the GetHashCode() methods for the two objects do not have to return different values.
The GetHashCode() method for an object must consistently return the same hash code as long as there is no modification to the object state that determines the return value of the object’s System.Object.Equals method. Note that this is true only for the current execution of an application, and that a different hash code can be returned if the application is run again.
For the best performance, a hash function should generate an even distribution for all input, including input that is heavily clustered. An implication is that small modifications to object state should result in large modifications to the resulting hash code for best hash table performance.
Hash functions should be inexpensive to compute.
The GetHashCode() method should not throw exceptions. MSDN
Of these the most important to note are points 3 and 4: It should generate an even distribution and should be inexpensive.
In the good ol’ days
After searching around you would usually find an implementation (which I did recently) along the lines of the following:
public override int GetHashCode()
{
unchecked
{
int hash = 17;
hash = hash * 23 + Lat.GetHashCode();
hash = hash * 23 + Long.GetHashCode();
hash = hash * 23 + Altitude.GetHashCode();
return hash;
}
}
I’m not going to claim I know how the maths works out, but I’m told it just does and that it satisifies the requirements mentioned above.
I’ve never been happy with this, as I am unable to prove the even distribution etc requirements, and am I missing brackets to ensure order of operation???
These days
Well, today I stumbled across this little Gem inside VS2017 (also VS2019).
Starting with:
public class Location
{
public int Long { get; set; }
public int Lat { get; set; }
public int Altitude { get; set; }
}
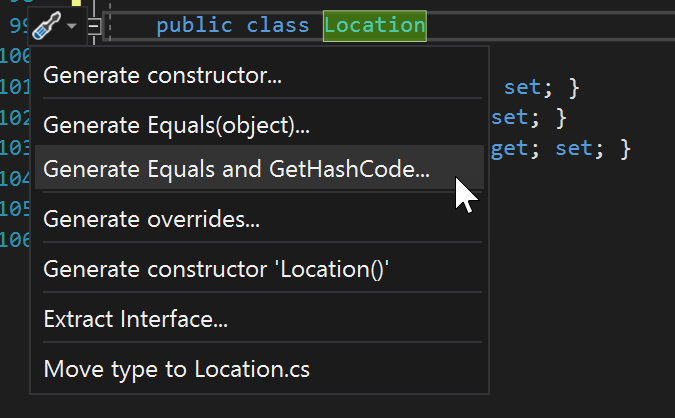
Place the cursor on the Class definition and open the Quick Actions menu ‘ctrl + .’, then select “Generate Equals and GetHashCode…”
Select which properties you want included in your equality check and voila. you are good to go. As an optional extra you can even choose to implement IEquatable too.
public class Location : IEquatable
{
public int Long { get; set; }
public int Lat { get; set; }
public int Altitude { get; set; }
public override bool Equals(object obj)
{
return Equals(obj as Location);
}
public bool Equals(Location other)
{
return other != null &&
Long == other.Long &&
Lat == other.Lat &&
Altitude == other.Altitude;
}
public override int GetHashCode()
{
return HashCode.Combine(Long, Lat, Altitude);
}
}
The final point of note is the calculation of the HashCode. No longer do we need to remember how to calculate, or worry about the effiency or the distribution because Microsoft have given us a handy helper
HashCode.Combine(Long, Lat, Altitude);
And thats it, one less thing for me to think about.
Read More