
SSW
New Jekyll Blog on Azure
I’ve left WordPress. Finally.
WordPress isn’t bad. In fact for most people I think WordPress or Medium are probably the right choice – but for about 18 months I’ve wanted to move to a solution where I hosted my content on GitHub and then published it from there.
Why ? (the original reasons from 18 months ago)
I love writing in MarkDown. I want to write more blogs and in order to write more – I need to enjoy doing it.
I wanted the content without HTML formatting. This allows me to do more with it.
I wanted to be able to collaborate with my blog content. I want other people to be able to make corrections / update / contribute to my content. If you want to make a change or an addition – feel free to make a pull request.
I wanted to own all my content in a portable format. I use a little Jekyll syntax, but most of the content on the site is written in pure, portable markdown
Why? (the driving reasons that made me finally do it)
I like having some ‘real’ projects to maintain
I wanted to be able to easily edit content offline
I wanted a project to use for Azure demos around topics like DevOps, containers and Azure FrontDoor
Why not ? (Reasons this approach is silly for most people)
You are maintaing code and investing time in something that someone else will do for (Almost) free
Other Solutions that I considered
Hosted Services
Medium https://medium.com/
If you just want to elegantly write content Medium is clean and awesome. This is a great option.
Hosted WordPress https://wordpress.com
WordPress.com is where I hosted my blog for the last 7 years. I set it up, and it just ran. I paid about $5/month to remove the adds and have a custom domain. It supports a huge ecosystem of plugins and functionality. For most developers this is probably my recommended solution. Official hosted wordpress – https://wordpress.com Alternative hosted WordPress (My friend Jason has used this for years and loves it) https://www.bluehost.com/
Hosted Ghost https://ghost.org
Ghost is where all the cool kids were at. If hosted Ghost were not 6x more expensive that WordPress, everyone would use this. This article from Troy Hunt is a great summary of why it’s the best choice if you are happy to pay the money. https://www.troyhunt.com/its-a-new-blog/
Self Hosted Services
Self Hosted Wordpress
Don’t do it.If you are going to do it yourself – Host Ghost
Self Hosted Ghost https://blog.ghost.org/2-0/
Watch this space for more on running Ghost images on Azure.
Resources and Thanks
I got the idea for this method from the old version of the Azure Docs which used Jekyll. I created this project from scratch because the old docs used very outdated versions of dependencies like Jekyll and Bootstrap but I have taken the page templates and a few scripts from their repo… so big thanks to the team who put it together !!!
Real-time face recognition with Microsoft Cognitive Services

TL;DR; check my GitHub project for bank transaction classification. https://github.com/jernejk/MLSample.SimpleTransactionTagging UPDATE: If you are looking to learn Machine Learning with minimum code and effort, check out Simplified
Jernej Kavka (JK)
New years goals
I’ve never been one to set myself new years resolutions, not for any particular reason, I just don’t. However, last year I set myself several goals and/or challenges.I’ve never been one to set myself new years resolutions, not for any particular reason, I just don’t. However, last year I set myself several goals and/or challenges.
Read 12 books in 12 months
12 blog posts
So how did I go?
12 books in 12 months
Well, I thought I was tracking alright until I started December with Principles by Ray Dalio, I soon realised that I was going to miss my deadline. As new years eve arrived I still had 120 pages to go. Although I was pleased with my progress throughout the year, one small part of me was dissapointed that I missed the mark… That was until I thought I’d take a photo of all the books I had read:
So instead of being 120 pages short of my goal, I was actually 400 pages ahead. Needless to say I was quite happy with that result.
12 blog posts
There was no coincidence that I aimed for 12 posts whilst reading 12 books, without restricting the content I was to write about, I figured I could at least do a write up of each book. Well… This one didn’t quite come to fruition. A total of 8 out of 12 posts last year, not a complete failure but not quite hitting the mark, plenty of room to improve.
2019 Goals
So what are the goals for this year?
More than 12 new blog posts (not including this one)
4 Tech talks, public speaking
10 new photo prints
Blog posts
I know I missed the mark last year, but this year I aim to be more vigilant on this one, if I am to make the most of this platform
Tech talks
Last year I was fortunate enough to perform a talk on a topic that interested me at the time, and had a ball doing it. The energy I got from doing this talk made me want to tackle even more. These talks will should also coincide with my first goal above
Photos
This one is more of a personal challenge. Over the years I haven’t dedicated as much time to photography as I have in the past, and with the renovations going on at home, I’ve decided we need some new prints for the walls.
NDC Sydney 2018 Bots – the Next UI Revolution
Bots are the new UI frontier. Siri, Google Assistant and Alexa started the trend, but no-UI is the future of UI. Users are going to expect to be able to have conversations with companies and organisations in the client that they have on hand. Don’t believe me? Gartner predicts that by 2020 30% of HTTP requests will be via bots.In this session, we will explore how the Microsoft Bot Framework makes it easy to build and connect intelligent bots to interact with users and services. Take your existing applications, your FAQ or a great new idea you have and build a bot that will run from your website or from Cortana, Skype, a phone call, text message, Teams, Slack, Facebook Messenger, Skype for Business and more.
If you missed the mobile revolution – why not lead in the bot wars?
[embedded content]
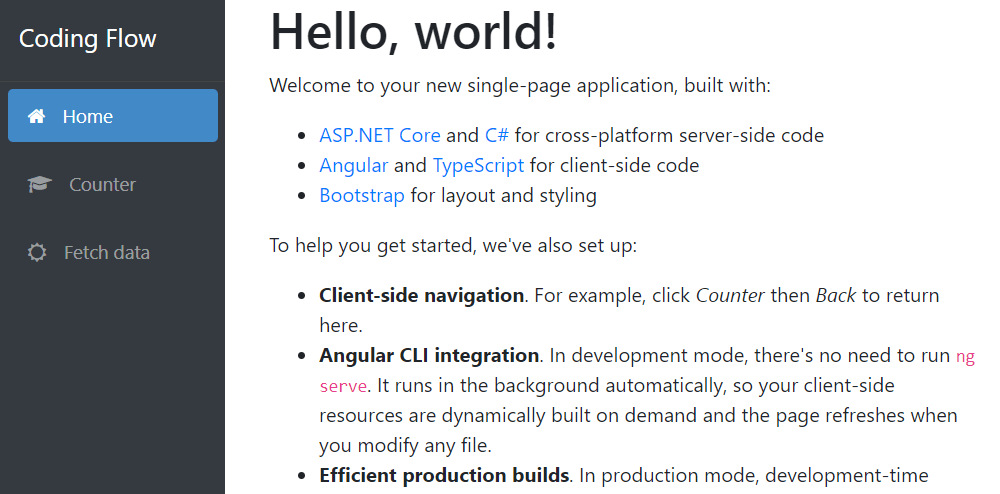
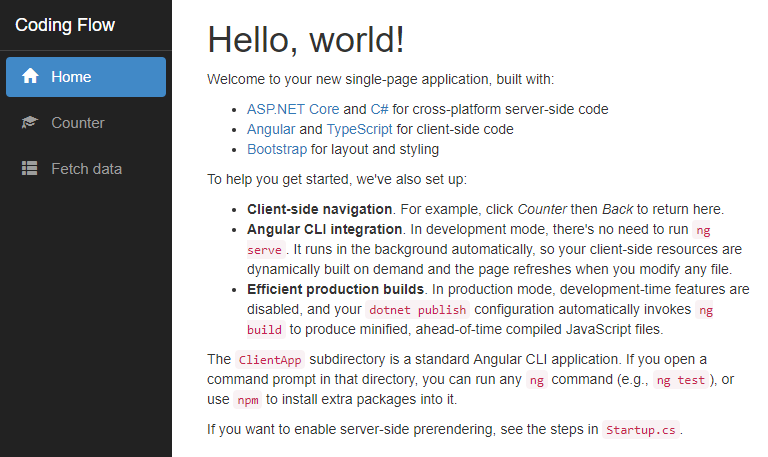
Building Single Page Applications on ASP.NET Core 2.2
The recently released ASP.NET Core 2.2 includes many improvements such as updated SPA templates. The templates can be used to build single page apps with Angular 6 + Angular CLI …
The post Building Single Page Applications on ASP.NET Core 2.2 appeared first on Jason Taylor.
Remote web debugging with Vorlon
In this post we’ll cover how to debug applications running in browser and/or devices that don’t have debugging abilities. We’ll manipulate DOM tree, see console output and more.
This post works great with remote debugging introduced in Remote debugging on Android and iOS devices blog post.
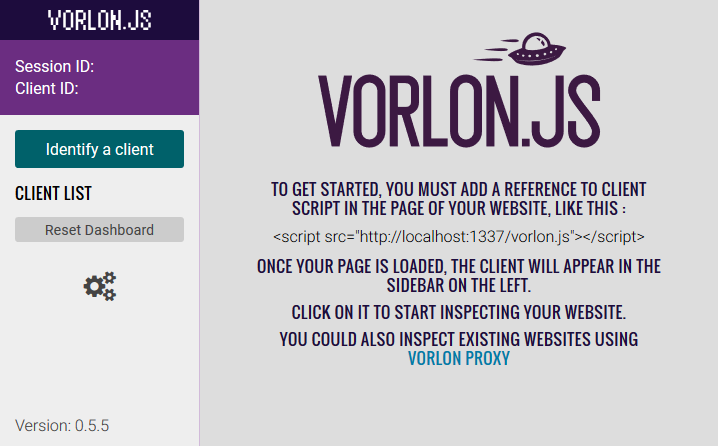
Vorlon.JS
In short Vorlon.JS is an open source, extensible, platform-agnostic tool for remotely debugging and testing your JavaScript.
We can debug multiple browser locally or remotely on devices. All we need to do is run Voltron on a server and a in the web application.
Get started
First install Voltron with NPM:
npm i -g vorlon
And add in index.html:
Run Vorlon in command line:
vorlon
Then go to localhost:1337 to access the dashboard.
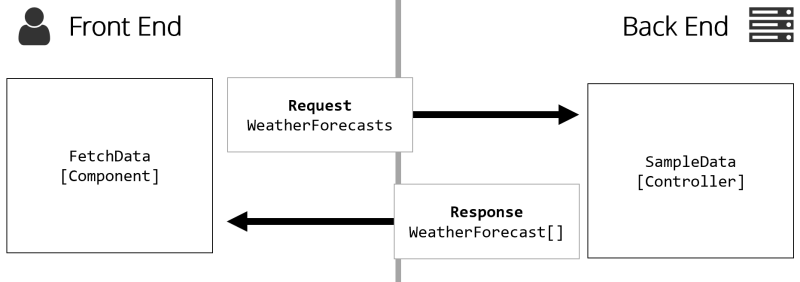
When accessing the website, we can see console logs, DOM tree and many more things.
Similarly as with Chrome/Edge/FireFox F12, we can highlight and modify DOM elements.
Let me know if you like me to write more about Vorlon and how to improve debugging on mobile devices.
SignalR – Why? Because its easy
2018-08-21CODING ·angular signalr realtime asp-net-core
SignalR has been around for a few years now (since 2013), offering real-time notifications to our .Net applications.SignalR has been around for a few years now (since 2013), offering real-time notifications to our .Net applications. I was always hesitant to implement any type of real-time notifications into my applications based on the following assumptions:
I work on enterprise applications, and my users don’t really need/expect it
It’s too hard
Assumption 1: Users don’t need it
Well, this is just an excuse to avoid the pain of implementation. In the modern web, our users are trained to expect responsive applications and to have information pushed to them: Message notifications, Emails, Tweets, it all happens quite subtly, but honestly, our users these days (especially in the world of Single-Page-Apps) really aren’t used to hitting refresh. My users are no different. If they don’t receive real-time feedback, they think the entire processing pipeline has faulted.
Assumption 2: It’s too hard
Wrong. Boy, was I wrong in that one too. With the release of ASP.NET Core 2.1 Microsoft has baked SignalR into the framework and made it so simple for us to add it to our websites.
As I’ve added SignalR to my production Angular/Web API apps, I’ve distilled the process into four simple steps for both the server and the client, and I want to show how easy it really is
Step 1. Create a Hub
namespace ShoppingList.Api.SignalR
{
public class ShoppingListHub : Hub
{
public const string SHOPPINGLIST_GROUP = “ShoppingList_”;
public async Task JoinList(string listId)
{
await Groups.AddToGroupAsync(this.Context.ConnectionId, $”{SHOPPINGLIST_GROUP}{listId}”);
}
public async Task LeaveList(string listId)
{
await Groups.RemoveFromGroupAsync(this.Context.ConnectionId, $”{SHOPPINGLIST_GROUP}{listId}”);
}
}
}
Our hub is effectively the controller of our SignalR channel. There is very little (actually nothing) that needs to live in our hub. In this implementation, I do have two methods: JoinList() and LeaveList() these methods allow users to subscribe and unsubscribe to groups, so we can broadcast messages only to those clients that have subscribed to the group.
Step 2: Create a notification service (optional)
public class ShoppingListNotificationService : IShoppingListNotificationService
{
private readonly IHubContext hub;
private readonly ShoppingListDbContext db;
public ShoppingListNotificationService(IHubContext hub, ShoppingListDbContext db)
{
this.hub = hub;
this.db = db;
}
public async Task NotifyShoppingListItemAdded(int shoppingListId, ShoppingListItem item)
{
var group = hub.Clients.Group($”{ShoppingListHub.SHOPPINGLIST_GROUP}{shoppingListId}”);
await group.SendAsync(“ShoppingListItem_Added”, item);
}
public async Task NotifyShoppingListItemUpdated(int shoppingListId, ShoppingListItem item)
{
var group = hub.Clients.Group($”{ShoppingListHub.SHOPPINGLIST_GROUP}{shoppingListId}”);
await group.SendAsync(“ShoppingListItem_Updated”, item);
}
public async Task NotifyShoppingListUpdated(Entities.ShoppingList item)
{
var group = hub.Clients.Group($”{ShoppingListHub.SHOPPINGLIST_GROUP}{item.Id}”);
await group.SendAsync(“ShoppingList_Updated”, item);
}
public async Task NotifyRefreshList()
{
await hub.Clients.All.SendAsync(“ShoppingLists_Refresh”, db.ShoppingLists);
}
}
This service is completely optional, but it allows us to encapsulate the calls to SignalR in one central location, and use it throughout our application. Within each message, we then broadcast the message to either all connected clients, or to a specific group of clients (Those that subscribed via the previous JoinList() method).
Step 3: Update API Controllers
[HttpPost(“{shoppingListId}/Items”)]
public async Task PostItem(int shoppingListId, [FromBody] ShoppingListItem item)
{
//…code removed for brevity
await notifications.NotifyShoppingListItemAdded(shoppingListId, item);
return CreatedAtRoute(“ShoppingListItem”, new { shoppingListId, item.Id }, item);
}
As items are Created, Updated or Deleted, we now ask the notification service to send the appropriate message.
Step 4: Configure Startup.cs
public void ConfigureServices(IServiceCollection services)
{
//Excess code removed for readability
//Turn on SignalR
services.AddSignalR();
//Register our Notification service in the DI Container
services.AddTransient();
}
// This method gets called by the runtime. Use this method to configure the HTTP request pipeline.
public void Configure(IApplicationBuilder app, IHostingEnvironment env)
{
//Excess code removed for readability
//Configure the Hub endpoint
app.UseSignalR(route = >
{
route.MapHub(“/hubs/shoppingLists”);
});
}
In ASP.NET Core 2.1 there is really only 2 steps required here:
Add SignalR to your services a. optional: Register your notification service with the DI container
Map the hub to a SignalR endpoint
Step 1: Install the SignalR client
npm -i –save @aspnet/signalr
Step 2: Create a service to manage the connection
@Injectable({
providedIn: ‘root’
})
export class SignalRService {
private _hubConnection: HubConnection;
isConnected = false;
constructor() {
this.init();
}
private init() {
this._hubConnection = new HubConnectionBuilder()
.withUrl(‘https://localhost:18111/hubs/shoppingLists’)
.build();
this._hubConnection.onclose(e = > {
this.isConnected = false;
if (e) {
console.log(‘Hub connection closed due to the following error’ + e.name);
console.log(e.message);
this.connect();
} else {
console.log(‘Hub connection closed’);
}
});
}
connect() {
this._hubConnection.start()
.then(() = > {
this.isConnected = true;
console.log(‘Hub connection started’);
})
.catch(err = > {
this.isConnected = false;
console.log(‘Error while establishing connection’);
});
}
}
The first part here is to build our hub connection and point it to the endpoint configured on the server. Then we need to remember to Start() our connection when we want to start listening to events.
Next, we want to listen to all the events that we configured in the notification service on the server
shoppingListItemAdded = new Subject();
shoppingListItemUpdated = new Subject();
init(){
//previous steps removed for clarity
this._hubConnection.on(‘ShoppingListItem_Added’, (item: ShoppingListItem) = > {
console.log(‘Item Added: ‘ + item.id);
this.shoppingListItemAdded.next(item);
});
this._hubConnection.on(‘ShoppingListItem_Updated’, (item: ShoppingListItem) = > {
console.log(‘Item Updated: ‘ + item.id);
this.shoppingListItemUpdated.next(item);
});
//The remaining events are handled in the same way
}
We are now listening to each event being raised and storing the results in an RxJS Subject.
joinShoppingList(id: number) {
this._hubConnection.invoke(‘JoinList’, id);
}
leaveShoppingList(id: number) {
this._hubConnection.invoke(‘LeaveList’, id);
}
Finally, we need the ability to invoke the JoinList() and LeaveList() methods we created on the hub.
SignalR.service.ts
@Injectable({
providedIn: ‘root’
})
export class SignalRService {
private _hubConnection: HubConnection;
isConnected = false;
shoppingListsRefresh = new Subject();
shoppingListItemAdded = new Subject();
shoppingListItemUpdated = new Subject();
shoppingListUpdated = new Subject();
constructor() {
this.init();
}
private init() {
this._hubConnection = new HubConnectionBuilder()
.withUrl(‘https://localhost:18111/hubs/shoppingLists’)
.build();
this._hubConnection.on(‘ShoppingListItem_Added’, (item: ShoppingListItem) = > {
console.log(‘Item Added: ‘ + item.id);
this.shoppingListItemAdded.next(item);
});
this._hubConnection.on(‘ShoppingListItem_Updated’, (item: ShoppingListItem) = > {
console.log(‘Item Updated: ‘ + item.id);
this.shoppingListItemUpdated.next(item);
});
this._hubConnection.on(‘ShoppingList_Updated’, (list: ShoppingList) = > {
console.log(‘ShoppingListUpdated: ‘ + list.id);
this.shoppingListUpdated.next(list);
});
this._hubConnection.on(‘ShoppingLists_Refresh’, () = > {
console.log(‘Refreshing Lists’);
this.shoppingListsRefresh.next();
});
this._hubConnection.onclose(e = > {
this.isConnected = false;
if (e) {
console.log(‘Hub connection closed due to the following error’ + e.name);
console.log(e.message);
this.connect();
} else {
console.log(‘Hub connection closed’);
}
});
}
connect() {
this._hubConnection.start()
.then(() = > {
this.isConnected = true;
console.log(‘Hub connection started’);
})
.catch(err = > {
this.isConnected = false;
console.log(‘Error while establishing connection’);
});
}
joinShoppingList(id: number) {
this._hubConnection.invoke(‘JoinList’, id);
}
leaveShoppingList(id: number) {
this._hubConnection.invoke(‘LeaveList’, id);
}
}
Step 3: Update the Components
ngOnInit() {
const param$ = this.route.params.pipe(
pluck(‘id’),
tap(id = > {
if (this.currentId) {
this.signalR.leaveShoppingList(this.currentId);
}
}),
tap(id = > {
this.signalR.joinShoppingList(+id);
this.currentId = +id;
}),
switchMap(id = > {
if (id === ‘new’) {
return of(new ShoppingList());
} else {
return this.service.get(+id);
}
})
);
const itemRefresh$ =
merge(this.signalR.shoppingListItemAdded, this.signalR.shoppingListItemUpdated).pipe(
switchMap(() = > this.service.get(this.currentId))
);
this.list$ = merge(param$, this.signalR.shoppingListUpdated, itemRefresh$);
}
Here, we do a few things. First up, configure our listener to the route being updated, and unsubscribe/subscribe to the desired lists notifications, then we also fetch the desired list from the server. Secondly, we merge the two Subjects from the notification service that we are interested in, and finally, we merge all the required triggers into one observable that ultimately populates the list$ property with the most current data from the server.
Conclusion
Microsoft has made it almost too trivial to add push notifications to your ASP.NET Core applications.
The client library is simply JS, as such can be used on any front-end
RxJS really simplifies our client code to merge the varying streams of information into one simple observable.
If you are interested in any of the code on this post, you can find it here on Github.
Building Single Page Applications on ASP.NET Core 2.1 with Angular 6 – Part 3: Implementing Open API
This is the third in a series of posts on Building Single Page Applications with ASP.NET Core 2.1 and Angular 6. The previous post provided instructions to upgrade to the …
The post Building Single Page Applications on ASP.NET Core 2.1 with Angular 6 – Part 3: Implementing Open API appeared first on Jason Taylor.
Building Single Page Applications on ASP.NET Core 2.1 with Angular 6 – Part 2: Upgrading Bootstrap

This is the second in a series of posts on building Single Page Applications with ASP.NET Core 2.1 and Angular 6. The previous post covered numerous getting started topics such …
The post Building Single Page Applications on ASP.NET Core 2.1 with Angular 6 – Part 2: Upgrading Bootstrap appeared first on Jason Taylor.
Building Single Page Applications on ASP.NET Core 2.1 with Angular 6 – Part 1: Getting Started
This is the first in a new series of posts on building Single Page Applications with ASP.NET Core 2.1 and Angular 6. There have been major improvements to both frameworks, …
The post Building Single Page Applications on ASP.NET Core 2.1 with Angular 6 – Part 1: Getting Started appeared first on Jason Taylor.